---
url: /codepush-alternative.md
---
# Cresc as a CodePush and App Center alternative
If your React Native team still needs over-the-air updates after App Center's retirement, Cresc is the practical replacement path: keep the OTA workflow, move to smaller delta patches, and keep rollback and CI/CD automation in reach.
## Why teams look for a replacement
- App Center and CodePush are no longer the long-term path for React Native OTA workflows.
- Teams still need to fix JavaScript bugs quickly without waiting for full store review cycles.
- Full-bundle update systems often waste bandwidth compared with delta delivery.
- Release engineers still need CI-friendly publishing, rollback behavior, and auditability.
## What Cresc gives you
- Delta OTA updates instead of shipping the full bundle on every change.
- Rollback support when a release fails after download.
- CLI and dashboard flows that fit existing CI/CD release pipelines.
- Self-host-friendly architecture for teams that want more control.
- Support across React Native, Expo-based workflows, Hermes, and Harmony integrations.
## Cresc vs legacy CodePush and App Center
| Capability | Cresc | Legacy CodePush / App Center |
| -------------------------------- | ----- | ------------------------------------- |
| OTA updates for React Native | Yes | Historically yes |
| Delta patch delivery | Yes | Limited / older workflow expectations |
| Active migration path today | Yes | No |
| Self-host friendly | Yes | No practical long-term path |
| CLI + dashboard publishing | Yes | Yes |
| Rollback support | Yes | Yes |
| Harmony-focused workflow support | Yes | No |
## Migration path in four steps
1. Install the Cresc CLI and integrate the SDK into your app.
2. Upload the production APK or IPA that matches the build users actually have installed.
3. Connect the app in your CI or release workflow.
4. Publish the next JavaScript update through Cresc and validate rollback plus adoption behavior.
Start here:
- [Installation and configuration](/docs/getting-started.md)
- [Code integration](/docs/integration.md)
- [Publishing hot updates](/docs/publish.md)
## Who should choose Cresc
Choose Cresc if your team needs at least one of these:
- A CodePush replacement that is still actively maintained.
- Smaller OTA downloads than full-bundle update systems.
- More control over hosting, observability, and release mechanics.
- A migration path that keeps your existing React Native release workflow recognizable.
## FAQ
### Is Cresc a direct replacement for CodePush?
Yes for the core OTA use case. You still upload a native baseline, publish JavaScript updates, and control rollout behavior, but Cresc is built around its own SDK, CLI, and dashboard instead of the old App Center service.
### What still requires a native release?
Native code changes, native dependency changes, and anything that modifies files under `ios/` or `android/` still requires a new compiled build. JavaScript and bundled assets are good OTA candidates.
### Can I migrate without redoing the whole app?
Usually yes. The migration work is mostly SDK integration, baseline upload, and release-process updates. The app does not need a full architecture rewrite.
### Where should I start?
If you want the fastest route, go to [Getting Started](/docs/getting-started.md) and [register a Cresc account](https://admin.cresc.dev/#/register).
### Contact Us
- [Email hi@cresc.dev](mailto:hi@cresc.dev)
- [GitHub Discussions](https://github.com/reactnativecn/react-native-update/discussions)
### Terms & Policies
- [User Agreement](https://cresc.dev/policy/)
- [Privacy Policy](https://cresc.dev/policy/#privacy)
### Help & Support
- [FAQ](/docs/faq)
- [CodePush Alternative](/codepush-alternative)
- [CodePush Migration](/codepush-migration-checklist)
- [Expo Updates vs Cresc](/expo-updates-vs-cresc)
- [GitHub Issues](https://github.com/reactnativecn/react-native-update/issues)
### Links
- [React Native OTA Guide](/react-native-ota-updates)
- [Expo Pricing vs Cresc](/expo-pricing-vs-cresc)
- [llms.txt](/llms.txt)
- [llms-full.txt](/llms-full.txt)
- [React Native](https://reactnative.dev/)
- [ReactJS](https://react.dev/)
© 2026 CHARMLOT PTE. LTD.
---
url: /docs/intro.md
---
# Cresc - Professional Over-the-Air Update Solution
Cresc (npm package: [`react-native-update`](https://www.npmjs.com/package/react-native-update)
[](https://www.npmjs.com/package/react-native-update)) is a **professional Over-the-Air (OTA) update service**
for React Native teams shipping globally. It is designed to keep release workflows lean, stable, and cost-efficient from small apps to large production fleets.
## 🚀 Why Choose Cresc?
### Ultimate Update Experience
- **🎯 Ultra-small update packages**: Incremental updates based on bsdiff/hdiff limits size to **tens to hundreds of KB**, saving 99%+ bandwidth compared to full-size updates.
- **⚡️ Lightning Fast Distribution**: Global CDN delivery and incremental patch transport keep updates fast and reliable with a **99.9%+** success rate.
- **🛡️ Secure and Reliable**: Built-in crash rollback mechanism automatically reverts failing patches, guaranteeing stability.
- **🌐 Full Platform Support**: Flawless support for **iOS** and **Android**.
- **🔍 Deep React Native Integration**:
- ✅ **Expo** - Seamless integration
- ✅ **New Architecture** - Immediate support
- ✅ **Hermes** - Full bytecode translation
- **📖 Open Source Ecosystem**: The client SDK, CLI tools, and admin UI are [fully open source on GitHub](https://github.com/reactnativecn/react-native-update). Transparent and auditable logic means you can host your own servers without vendor lock-in.
- **🔒 Data Security**: Intercept and handle data analytics yourself. You retain full control.
- **💬 Professional Support**: Dedicated technical support to troubleshoot issues and keep your app stable.
- **🏆 Proven Track Record**: Running reliably since 2016, powering numerous well-known apps and enterprises.
## 💰 Unbeatable Value
Compared to other alternatives, Cresc is more powerful yet highly affordable:
| Feature | Cresc | Expo Updates |
| -------------------- | ----------------------- | ----------------------------- |
| **Starting Price** | Free plan or $19/mo | \~$30/mo |
| **Bandwidth Limits** | Built-in, no extra fees | Extra costs apply over limits |
| **Package Size** | KB scale (Incremental) | MB scale (Full bundle) |
:::warning
**Note**: Microsoft App Center (Code Push) officially shut down on March 31, 2025. If you are using Code Push, now is the best time to migrate to Cresc!
:::
With Cresc, your team gains:
- ✅ **90%+ reduction in CDN bandwidth costs**
- ✅ **10x faster iteration speeds** (bypass app store review times)
- ✅ **Minute-level emergency bug fixes**
- ✅ **99%+ user update adoption rates**
- ✅ **Flexibility in development cycles**
### Simple to Use
```js
// Integrate in 3 lines of code
import { UpdateProvider, Cresc } from "react-native-update";
const crescClient = new Cresc({ appKey });
```
Built-in policies available out of the box:
- 🔕 **Silent Updates** - Background downloads, completely transparent to users
- 💬 **Prompted Updates** - Friendly system alerts for available patches
- ⚙️ **Custom Strategies** - Fully API-driven flow control
## 🚦 Get Started
Only 3 steps to unlock instant OTA capabilities for your React Native app:
1. **[Installation & Config](/docs/getting-started.md)** - Basic setup takes only 5 mins
2. **[Code Integration](/docs/integration.md)** - A few lines of wrapper code
3. **[Publish Updates](/docs/publish.md)** - One CLI command to push new versions
:::info
Not sure if this fits your project? Check our [FAQ](/docs/faq.md), start a thread in [GitHub Discussions](https://github.com/reactnativecn/react-native-update/discussions), or email us at [hi@cresc.dev](mailto:hi@cresc.dev).
:::
Start using Cresc today, and bring a professional OTA update workflow to your React Native app!
---
url: /docs/getting-started.md
---
# Installation & Config
First, you should have an application developed based on React Native. We refer to the directory containing `package.json` as your application's `root directory`.
If you haven't initialized an application yet, please see [Getting Started with React Native](https://reactnative.dev/docs/getting-started).
We assume you already have everything set up for React Native development, including `Node.js`, `Xcode`, `Android SDK`, etc.
### Installation
Run the following commands in your project's root directory (if you use other package managers like yarn, substitute accordingly):
**React Native**
```bash
# Install the CLI tool globally first
npm i -g react-native-update-cli
# Then install the hot update module inside the project directory
npm i react-native-update
# If not using Expo, navigate to the iOS folder and install pods
cd ios && pod install
```
**Expo**
```bash
# Install the CLI tool globally first
npm i -g react-native-update-cli
# Then install the hot update module inside the project directory
npm i react-native-update
# If using expo, requires Expo 50 or higher. Use prebuild command to prebuild the project
npx expo prebuild
# Then enter the iOS folder and install pods
cd ios && pod install
```
:::warning
Note: If using Expo, please do NOT install `expo-updates` simultaneously, as it will cause update function conflicts. Also, New Architecture support in Expo versions under 51 is incomplete and might not work properly. It's recommended to use the latest version of Expo possible for New Architecture setups.
:::
:::warning
Please do not mix package managers like `npm/yarn/pnpm` and their associated `lock` files. Stick to one manager across your team and keep one format of the `lock` file.
:::
:::info
Remember, any modifications under the `ios` or `android` directories require recompilation (using `npx react-native run-ios/android` or compiling inside Xcode/Android Studio) to take effect.
:::
### Manual Link
If RN version >= 0.60, you don't need this manual linking step.
:::warning
Note: If you have a brownfield native-RN project, or monorepo, or any custom scenario, the auto-linking function might fail because custom configurations might be incomplete or not fit the standard RN directory structure. Even if RN version >= 0.60, you might still need manual link operation.
:::
#### iOS
RN < 0.60 and using CocoaPods (Recommended)
1. Add to `ios/Podfile`:
```ruby
pod 'react-native-update', path: '../node_modules/react-native-update'
```
2. Run `pod install` in the `ios` directory.
3. Recompile.
RN < 0.60 without CocoaPods
1. In Xcode's Project Navigator, right click `Libraries` ➜ `Add Files to [Your Project Name]`
2. Go to `node_modules` ➜ `react-native-update` ➜ `ios` and select `RCTPushy.xcodeproj`
3. In Xcode's Project Navigator, select your project. Under `Build Phases` ➜ `Link Binary With Libraries`, add `libRCTPushy.a`, `libz.tbd`, `libbz2.1.0.tbd`.
4. Under `Build Settings`, search for `Header Search Path`, add `$(SRCROOT)/../node_modules/react-native-update/ios`, and check `recursive`.
5. Under `Build Phases`, add a `New Run Script Phase` with the following content:
```bash
#!/bin/bash
set -x
DEST="../node_modules/react-native-update/ios/"
date +%s > "$DEST/pushy_build_time.txt"
```
7. Attempt compilation. If successful, a `pushy_build_time.txt` file is generated inside `../node_modules/react-native-update/ios/`. Then, add the resulting `pushy_build_time.txt` into `Copy Bundle Resources`.
#### Android
RN < 0.60 or other scenarios preventing auto-link
1. Add the following to `android/settings.gradle`:
```groovy
include ':react-native-update'
project(':react-native-update').projectDir = new File(rootProject.projectDir, '../node_modules/react-native-update/android')
```
2. Add this piece of code to the dependencies section inside `android/app/build.gradle`:
```groovy
implementation project(':react-native-update')
```
3. Open `android/app/src/main/java/[...]/MainApplication.java`:
- Add `import cn.reactnative.modules.update.UpdatePackage;` at the top of the file
- Add `new UpdatePackage()` inside the `getPackages()` method (watch out for commas)
### Configuring the Bundle URL
If you use `expo` 48+ and `react-native-update` >= 10.28.2, the bundle URL configures automatically. Skip straight to the [next step](#adding-a-deep-link-for-testing).
If you don't use `expo`, or use an expo version under 48, manually follow the steps down below.
#### iOS
Add the following to your `AppDelegate.mm` / `AppDelegate.m` / `AppDelegate.swift` file (different RN versions have different file suffixes):
:::warning
Note: If your project mixes native apps with RN, ensure you **do not directly assign the bundleURL while initializing the rootView**. Always initialize bridge using `initWithDelegate`, then initialize rootView via `initWithBridge`. Otherwise, the updating feature will likely break.
:::
**Objective-C**
```c
// ... Other code
#import "AppDelegate.h"
#import "RCTPushy.h" // <-- Add this header import outside of any conditionals
// Sometimes there are conditionals for flipper
// #if DEBUG
// Do NOT place #import "RCTPushy.h" inside conditionals here
// #import
// ...
// #endif
// For RN >= 0.74 update bundleURL
- (NSURL *)bundleURL
{
#if DEBUG
// Leave DEBUG config as is
return [[RCTBundleURLProvider sharedSettings] jsBundleURLForBundleRoot:@"index"];
#else
return [RCTPushy bundleURL]; // <-- Replace the non-DEBUG section with our hot update bundle URL provider
#endif
}
// For RN < 0.74 update sourceURLForBridge
- (NSURL *)sourceURLForBridge:(RCTBridge *)bridge
{
#if DEBUG
// Leave DEBUG config as is
return [[RCTBundleURLProvider sharedSettings] jsBundleURLForBundleRoot:@"index"];
#else
return [RCTPushy bundleURL]; // <-- Replace the non-DEBUG section with our hot update bundle URL provider
#endif
}
```
**Swift**
```swift
import UIKit
import React
import React_RCTAppDelegate
import ReactAppDependencyProvider
import react_native_update
@main
class AppDelegate: RCTAppDelegate {
// ... Other code
override func bundleURL() -> URL? {
#if DEBUG
// Leave DEBUG config as is (meaning you cannot OTA test in DEBUG)
RCTBundleURLProvider.sharedSettings().jsBundleURL(forBundleRoot: "index")
#else
RCTPushy.bundleURL() // <-- Replace the non-DEBUG section with our hot update bundle URL provider
#endif
}
}
```
#### Android
Add the following piece of code inside `MainApplication` (if integrating with a native project not utilizing `ReactApplication`, use [this API integration instead](/docs/api.md#updatecontextsetcustominstancemanagerreactinstancemanager-instancemanager)):
**Kotlin (RN 0.82 or up)**
```kotlin
// ... Other code
// ↓↓↓ Make sure to add this import
import cn.reactnative.modules.update.UpdateContext
// ↑↑↑
class MainApplication : Application(), ReactApplication {
override val reactHost: ReactHost by lazy {
getDefaultReactHost(
context = applicationContext,
packageList =
PackageList(this).packages.apply {
// Packages that cannot be auto-linked yet can be added manually here, for example:
// add(MyReactNativePackage())
},
// ↓↓↓ Add this parameter
jsBundleFilePath = UpdateContext.getBundleUrl(this),
// ↑↑↑
)
}
// ...Other code
}
```
**Kotlin (RN 0.81 or under)**
```kotlin
// ... Other code
// ↓↓↓ Make sure to add this import
import cn.reactnative.modules.update.UpdateContext
// ↑↑↑
class MainApplication : Application(), ReactApplication {
override val reactNativeHost: ReactNativeHost =
object : DefaultReactNativeHost(this) {
// ↓↓↓ Add this block entirely within DefaultReactNativeHost!
override fun getJSBundleFile(): String? {
return UpdateContext.getBundleUrl(this@MainApplication)
}
// ↑↑↑
// ...Other code
}
}
```
**Java**
```java
// ... Other code
// ↓↓↓ Make sure to add this import
import cn.reactnative.modules.update.UpdateContext;
// ↑↑↑
public class MainApplication extends Application implements ReactApplication {
private final ReactNativeHost mReactNativeHost =
// legacy RN versions might show new ReactNativeHost(this)
new DefaultReactNativeHost(this) {
// ↓↓↓ Add this block entirely within DefaultReactNativeHost!
@Override
protected String getJSBundleFile() {
return UpdateContext.getBundleUrl(MainApplication.this);
}
// ↑↑↑
// ...Other code
}
}
```
:::info
Remember, any modifications under the `ios` or `android` directories require recompilation (using `npx react-native run-ios/android` or compiling inside Xcode/Android Studio) to take effect.
:::
### Overriding Android's onCreate
If your app uses `react-native-screens` through `react-navigation`, Android can show a blank screen after an OTA-triggered restart unless `RNScreensFragmentFactory` is registered in `MainActivity`.
Do not set the fragment factory in `MainActivityDelegate`. Register it in `MainActivity` itself.
For background and edge-case notes, see the [react-native-screens Android documentation](https://github.com/software-mansion/react-native-screens?tab=readme-ov-file#android).
**Kotlin**
```kotlin
// android/app/src/main/java/[...]/MainActivity.kt
import android.os.Bundle
import com.swmansion.rnscreens.fragment.restoration.RNScreensFragmentFactory
class MainActivity : ReactActivity() {
// ...other codes
override fun onCreate(savedInstanceState: Bundle?) {
supportFragmentManager.fragmentFactory = RNScreensFragmentFactory()
super.onCreate(savedInstanceState)
// If your dependency versions do not provide RNScreensFragmentFactory,
// fall back to:
// super.onCreate(null)
}
}
```
**Java**
```java
// android/app/src/main/java/[...]/MainActivity.java
import android.os.Bundle;
import com.swmansion.rnscreens.fragment.restoration.RNScreensFragmentFactory;
public class MainActivity extends ReactActivity {
// ...other codes
@Override
protected void onCreate(Bundle savedInstanceState) {
getSupportFragmentManager().setFragmentFactory(new RNScreensFragmentFactory());
super.onCreate(savedInstanceState);
// If your dependency versions do not provide RNScreensFragmentFactory,
// fall back to:
// super.onCreate(null);
}
}
```
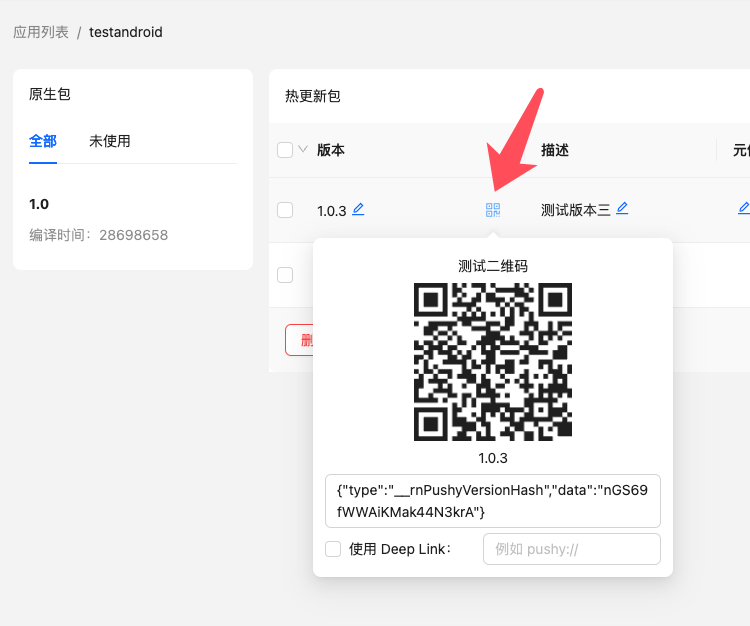
### Adding A Deep Link For Testing
Deep links make OTA testing much easier because you can open a specific update payload directly from a QR code or test page.
**Android**
In `android/app/src/main/AndroidManifest.xml`:
```xml
```
**iOS**
Please refer to the [React Native Documentation](https://reactnative.dev/docs/linking#enabling-deep-links).
***
After you finish compiling the app and uploading the release package, Cresc can generate a QR code for OTA testing.
 Enable the `Use Deep Link` option in the dashboard and enter the custom URL scheme you configured for the app.
If the release has just been uploaded, give the backend a short moment to prepare the test payload before scanning the QR code.
:::info
If you implement a custom update UI, read the update state from `useUpdate()` instead of trying to parse the deep-link payload yourself.
:::
### Disabling Android Image Crunch Operations
Android can automatically reprocess PNG assets during release builds. That makes binary diffs less predictable and can unnecessarily increase package size. Disable `crunchPngs` in the release build type:
```groovy
// In android/app/build.gradle
android {
// ...
signingConfigs {
// ...
}
buildTypes {
release {
// ...
crunchPngs false
}
}
}
```
### Login & Creating Applications
Create an account and sign in at [admin.cresc.dev](https://admin.cresc.dev), then use the CLI to authenticate locally:
```bash
$ cresc login
email: you@example.com
password: your-password
```
The CLI stores working state in a local `.update` directory. Add `.update` to your `.gitignore` so temporary metadata does not enter source control.
Then create or select the app records that match your iOS and Android packages:
```bash
$ cresc createApp --platform ios
App Name: My App iOS
$ cresc createApp --platform android
App Name: My App Android
```
:::info
Keep the names distinct if you manage iOS and Android separately.
:::
If the app records already exist, select them locally instead:
```bash
$ cresc selectApp --platform ios
1) Nemo Fish (ios)
2) Catch Wealth (ios)
Total 2 ios apps
Enter appId: 1
```
This writes `update.json` into your project:
```bash
{
"ios": {
"appId": 1,
"appKey": ""
},
"android": {
"appId": 2,
"appKey": ""
}
}
```
Commit `update.json` so the app can resolve the correct `appKey` during builds.
At this point you are ready for [Code Integration](/docs/integration.md).
---
url: /docs/integration.md
---
# Code Integration
Once installation and native configuration are complete, the next step is wiring Cresc into your app code.
### Retrieve your `appKey`
Each platform uses its own `appKey`. The value is stored in `update.json`, which is created by `cresc createApp` or `cresc selectApp`.
```javascript
import { Platform } from "react-native";
import _updateConfig from "./update.json";
const { appKey } = _updateConfig[Platform.OS];
```
You can also find the `appKey` in the Cresc dashboard.
### Initialize the client
```js
import { UpdateProvider, Cresc } from "react-native-update";
const crescClient = new Cresc({
appKey,
// Updates are skipped in development by default.
// Set debug: true if you want to test update checks in development.
// Applying the patch still requires a release build.
// debug: true,
});
export default function Root() {
return (
);
}
```
After this, the default OTA flow already works. Cresc can check for updates and show the built-in alert flow automatically.
### Choose your check strategy
`checkStrategy` controls **when** Cresc checks for updates:
- `"both"`: Check on cold start and when the app returns from background.
- `"onAppStart"`: Check only on cold start.
- `"onAppResume"`: Check only when resuming from background.
- `null`: Disable automatic checks and call `checkUpdate()` yourself.
```js
const crescClient = new Cresc({
appKey,
checkStrategy: "onAppStart",
});
```
### Choose your update strategy
`updateStrategy` controls **how** Cresc handles an available update:
- `"alwaysAlert"`: Always show the default update alert flow.
- `"alertUpdateAndIgnoreError"`: Show the default alert flow and ignore download errors in the UI.
- `"silentAndNow"`: Download silently and switch immediately after the update is ready.
- `"silentAndLater"`: Download silently and apply on a later restart.
- `null`: Disable the built-in UI so you can build the full experience yourself.
```js
const crescClient = new Cresc({
appKey,
updateStrategy: "silentAndLater",
});
```
### Build a custom update UI
If you want full control over the UI, disable the built-in update strategy and use `useUpdate()`:
```js
const crescClient = new Cresc({
appKey,
updateStrategy: null,
debug: true,
});
```
Example:
```js
import { useState } from "react";
import { Text, View, TouchableOpacity } from "react-native";
import { Banner, Icon, Snackbar } from "react-native-paper";
import { useUpdate } from "react-native-update";
function App() {
const {
checkUpdate,
downloadUpdate,
switchVersionLater,
switchVersion,
updateInfo,
progress: { received, total } = {},
} = useUpdate();
const [showUpdateBanner, setShowUpdateBanner] = useState(false);
const [showUpdateSnackbar, setShowUpdateSnackbar] = useState(false);
const snackbarVisible = showUpdateSnackbar && updateInfo?.update;
return (
Download progress: {received} / {total}
{
checkUpdate();
setShowUpdateSnackbar(true);
}}
>
Check for updates
{snackbarVisible && (
{
setShowUpdateSnackbar(false);
}}
action={{
label: "Update",
onPress: async () => {
setShowUpdateSnackbar(false);
if (await downloadUpdate()) {
setShowUpdateBanner(true);
}
},
}}
>
Update {updateInfo.name} is available.
)}
{
switchVersionLater();
setShowUpdateBanner(false);
},
},
]}
icon={({ size }) => (
)}
>
The update has finished downloading.
);
}
```
### Understand the `updateInfo` states
After `checkUpdate()`, Cresc exposes state through `useUpdate()`:
1. `{ expired: true }`: The installed native baseline is no longer valid. Prompt the user to install a newer native build if needed.
2. `{ upToDate: true }`: No OTA update is currently available.
3. `{ update: true }`: An OTA update is available. Use `name`, `description`, `metaInfo`, and the download flow to drive your UI.
When `updateInfo.update` is true, call `downloadUpdate()` and wait for it to resolve before assuming the patch is ready. The `progress` fields are useful for UI, but the promise result is the reliable completion signal.
### Forward OTA analytics into your own tools
Use the `logger` option if you want to pipe update events into your analytics system:
```ts
import { getAnalytics, logEvent } from "firebase/analytics";
const analytics = getAnalytics();
const crescClient = new Cresc({
appKey,
logger: ({ type, data }) => {
logEvent(analytics, "cresc_" + type, data);
},
});
```
### Continue
- [API reference](/docs/api.md)
- [Best practices](/docs/bestpractice.md)
- [Publishing hot updates](/docs/publish.md)
---
url: /docs/publish.md
---
# Publishing Hot Updates
Now that your app can detect updates, let's learn how to publish and update it. See the flow below:
```mermaid
flowchart TD
codebase["Code Source Repository"]
user["Users with matching native baseline version"]
subgraph nativeRelease["Publishing Native Baseline Version"]
tagNativeVersion["Tag Native Version in git"]
nativePackage["Native Full Package (apk or ipa)"]
newNativeVersion["New Native Baseline Version"]
tagNativeVersion -->|"Compile"| nativePackage
nativePackage -->|"Upload with cresc uploadApk/uploadIpa"| newNativeVersion
end
subgraph hotUpdateRelease["Publishing Hot Update Version"]
tagBundleVersion["Tag Hot Update Version in git"]
bundlePackage["JS Code and Assets (.ppk file)"]
someNativeVersions["One or more Native Baseline Versions"]
tagBundleVersion -->|"Generate with cresc bundle"| bundlePackage
bundlePackage -->|"Bind"| someNativeVersions
end
codebase -->|"Modify JS code, JS components, or JS assets"| hotUpdateRelease
codebase -->|"Modify native code, native settings, or native assets"| nativeRelease
hotUpdateRelease -->|"Push incremental hot update (.diff file)"| user
```
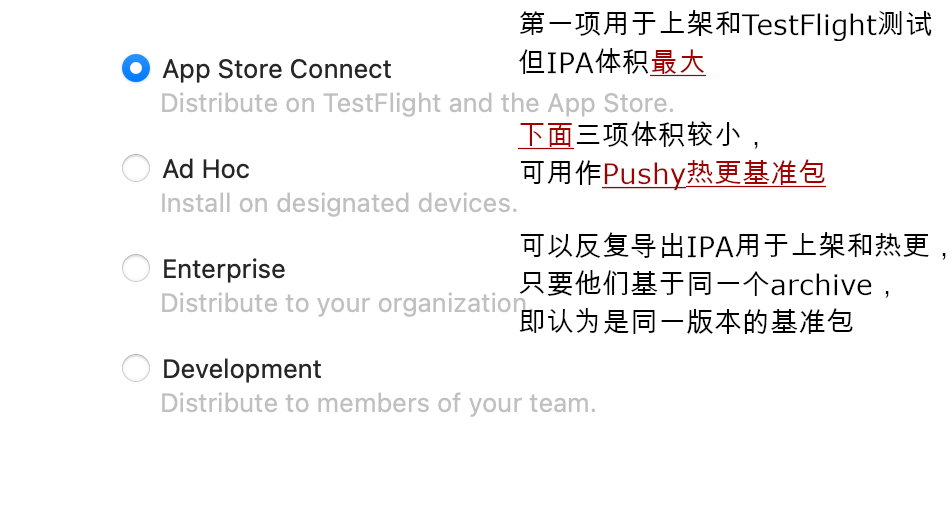
1. We first need to build a native release version. Before building, ensure `react-native-update` is integrated, tested, and works correctly. For Android, [disable `crunchPngs`](/docs/getting-started.md#disabling-android-image-crunch-operations). See documentation for [iOS Build](https://reactnative.dev/docs/publishing-to-app-store) and [Android Build](https://reactnative.dev/docs/signed-apk-android). After building, run `cresc uploadIpa` or `cresc uploadApk` to upload the package to Cresc servers to serve as the baseline for delta comparisons. Keep a copy of this installation package; the package distributed to users `must be strictly identical` to the uploaded one. We recommend using git tags for native versioning (e.g., `v1.0.0`).
2. Iterate on your business logic over the baseline (add/remove JS code, static assets). Run `cresc bundle` to generate and publish a hot update without recompiling the native app. We recommend using git tags for hot update versioning (e.g., `v1.0.1`).
3. If there are native changes during iteration, you must publish and upload a new native baseline version (repeat step 1, but set a different native version number). You can maintain just one native baseline or multiple versions concurrently.
## Publishing Native Baseline Version
### iOS
Refer to [Running On Device](https://reactnative.dev/docs/running-on-device) to ensure you are using the offline bundle.
Follow the standard flow to archive the `.ipa` file:
1. In Xcode, select a real device or Generic iOS Device.
2. Go to Product - Archive.
3. After Archiving, select `Export` to generate the .ipa file.
4. Run the following command to upload it:
```bash
$ cresc uploadIpa
```
The `CFBundleShortVersionString` in `ios/[project]/Info.plist` will be recorded as the `packageVersion`.
You can now upload this version to the App Store, or test it on devices via TestFlight. Note: Testing hot updates directly via Xcode is not supported yet.
If you re-archive later (e.g., modifying native code/configs), you must **change the version number**, and `uploadIpa` again. Otherwise, identically versioned native packages will [fail to receive hot updates due to mismatched build timestamps](/docs/faq.md#error-hot-update-paused-reason-build-timestamp-mismatch).
### Android
Set up signing per [Android Signed APK](https://reactnative.dev/docs/signed-apk-android). Run `./gradlew assembleRelease` or `./gradlew aR` in the `android` folder. The APK will be under `android/app/build/outputs/apk/release/app-release.apk`.
Upload it via:
```bash
$ cresc uploadApk android/app/build/outputs/apk/release/app-release.apk
# If you build an .aab package, use:
# cresc uploadAab android/app/build/outputs/bundle/release/app-release.aab
```
The `versionName` in `android/app/build.gradle` is recorded as the `packageVersion`.
You can now publish this version to app markets or install it directly for testing.
If you rebuild native code later, you must **change the version number**, and `uploadApk` again. Otherwise, [hot updates will fail due to build timestamp mismatches](/docs/faq.md#error-hot-update-paused-reason-build-timestamp-mismatch).
## Publishing Hot Update Version
Modify a line of code, and run `cresc bundle --platform ` to generate a new hot update version.
:::info
If you use frameworks without `index.js` like modern `expo`, the `bundle` command will fail. Manually create an `index.js` file importing the framework's entry file, referring to `main` in `package.json`. For `expo`, `index.js` looks like:
```js
import "expo-router/entry";
```
:::
```bash
$ cresc bundle --platform android
Bundling with React Native version: 0.22.2
Bundled saved to: build/output/android.1459850548545.ppk
Would you like to publish it?(Y/N)
```
Input Y to upload immediately, or run `cresc publish --platform android build/output/android.1459850548545.ppk` later.
```
Uploading [========================================================] 100% 0.0s
Enter version name:
Enter description:
Enter meta info: {"ok":1}
Ok.
Would you like to bind packages to this version?(Y/N)
```
The version is stored on the server, but users cannot see it until you bind native packages to it.
Input Y to bind immediately, or run `cresc update --platform ` later to bind previously uploaded versions. You can also drag and drop native versions to matching hot updates on the web dashboard.
```
┌────────────┬──────────────────────────────────────┐
│ Package Id │ Version │
├────────────┼──────────────────────────────────────┤
│ 46272 │ 2.0(normal) │
├────────────┼──────────────────────────────────────┤
│ 45577 │ 1.0(normal) │
└────────────┴──────────────────────────────────────┘
Total 2 packages
Enter package id: 46272
```
After binding, the server takes a few seconds to generate diff patches, and clients will receive updates.
To publish new updates thereafter, repeatedly run `cresc bundle` without recompiling native code.
Congratulations! You have completed the hot update integration.
## Canary Release (Gradual Rollout)
Canary releases mitigate risk by gradually expanding the update scope to test stability.
### What is a Canary Release?
Before pushing updates globally, you push them to a small subset (e.g., 5%, 10%) of users, observe their metrics, and gradually widen the scope to 100%.
### Benefits
- **Lower Risk**: Bugs only affect small subsets, enabling swift rollbacks.
- **Verify Stability**: Observe performance across varied real-world networking environments.
- **Smooth Transitions**: Prevents severe server CPU usage spikes during mass updates.
- **Fast Recovery**: Halts rollouts immediately minimizing global impact.
### How it Works
When you configure a canary percentage (e.g., 10%), update queries calculate a hash using the device's UUID:
- Users within the bucket receive the newest updates.
- Users outside receive the previous full version or no update.
- The hash remains stable; multiple checks won't flip a user's bucket state.
### Usage
#### Web Dashboard
1. Log into the Cresc Dashboard.
2. Select App and Native Version.
3. Click "Publish".
4. Adjust the rollout percentage.
#### Command Line
Review the [rollout parameter in the CLI docs](/docs/cli.md#cresc-update).
### Notes
:::warning
**Important**: Canary versions form independent bindings with Native packages.
:::
- **One Canary Version At A Time**: Each Native Version can bind to one Canary update (\<100%) and one Full update concurrently.
- **Priority**: Users inside the canary bucket receive the canary update. Others receive the Full update.
- **Promoting to Full**: Bumping the percentage to 100% promotes the canary to a full release automatically, replacing any older full releases.
- **Client Requirements**: Features require `react-native-update` >= 10.32.0.
---
url: /docs/api.md
---
# API Reference
### JavaScript Methods
#### new Cresc(options: CrescOptions)
Creates a Cresc OTA service instance, with the following constructor parameters:
```ts
interface CrescOptions {
// Required, obtained via cresc createApp/selectApp command or the admin panel
appKey: string;
// Custom log output, can also be used to report analytics
logger?: ({ type, data }: { type: EventType; data: EventData }) => void;
// Strategy for automatically checking updates
checkStrategy?:
| "onAppStart" // Only when app starts
| "onAppResume" // Only when app switches from background to foreground
| "both"; // Default, includes both scenarios
| null; // Do not check for updates automatically, must call checkUpdate manually. Requires v10.4.2+
// Strategy for downloading and applying updates automatically
updateStrategy?:
| "alwaysAlert" // Default in __DEV__, uses system alert to prompt update and show errors
| "alertUpdateAndIgnoreError" // Default in production, prompts update using system alert, but suppresses error alerts
| "silentAndNow" // Automatically downloads silently and applies immediately
| "silentAndLater"; // Automatically downloads silently, but applies only after the user restarts the app
| null; // Do not download and apply automatically. Choose this if you need a custom UI.
// Whether to automatically mark as successful after rebooting from an update, default: true
// Manually marking is generally not recommended
autoMarkSuccess?: boolean;
// Whether to clear the last error after several ms, default: do not clear
dismissErrorAfter?: number;
// Whether to check for updates in the development environment, default: false. Enable this if you need to debug OTA in dev.
// Even if enabled, it can only check and download updates, but cannot actually apply them. Applying updates requires a release build.
// Requires v10.4.2+
debug?: boolean;
// Whether to throw an error when calling checkUpdate and downloadUpdate, default: false (get error info via lastError)
// When enabled, you can use try/catch blocks. lastError will still be available.
// try {
// await checkUpdate();
// } catch (e) {
// console.error(e);
// }
// Requires v10.15.2+
throwError?: boolean;
// Executed before checking for updates, returning false cancels the check
// Requires v10.12.0+
beforeCheckUpdate?: () => Promise;
// Executed before downloading updates, returning false cancels the download. Can be used with custom metaInfo for flow control.
// Requires v10.12.0+
beforeDownloadUpdate?: (info: UpdateInfo) => Promise;
// Executed after downloading updates, returning false stops the built-in strategy.
// Requires v10.27.0+
afterDownloadUpdate?: (info: UpdateInfo) => Promise;
// Executed when the native package is expired, returning false stops the built-in strategy.
// Requires v10.28.2+
onPackageExpired?: (info: UpdateInfo) => Promise;
}
// Log event types
type EventType =
// Update failed, rolled back after reboot
| "rollback"
// Error during check
| "errorChecking"
// Initiating check
| "checking"
// Downloading update
| "downloading"
// Download successful
| "downloadSuccess"
// Update failed
| "errorUpdate"
// Update success
| "markSuccess"
// Downloading APK
| "downloadingApk"
// User rejected storage permission before downloading APK
| "rejectStoragePermission"
// Error requesting storage permission
| "errorStoragePermission"
// Error while downloading/installing APK
| "errorDownloadAndInstallApk";
// Log event data
interface EventData {
// Hash of the current completed update, empty string if no update applied
currentVersion: string;
// Client version info
cInfo: {
rnu: string; // react-native-update version
rn: string; // react-native version
os: string; // OS and version
uuid: string; // User identifier
};
// Native package version
packageVersion: string;
// Build timestamp
buildTime: number;
// Error related info
message?: string;
// Hash of the rolled-back version
rolledBackVersion?: string;
// Hash of the failed new version
newVersion?: string;
// Additional data
[key: string]: any;
}
```
#### useUpdate()
Utility functions for OTA updates. This method can also be imported using the alias `useCresc`.
:::info
Note that `useUpdate` cannot be called directly inside the component that uses `` (typically the root component). It can only be called by its children.
:::
```js
const {
checkUpdate,
switchVersion,
switchVersionLater,
markSuccess,
dismissError,
downloadUpdate,
downloadAndInstallApk,
getCurrentVersionInfo,
currentVersionInfo,
parseTestQrCode,
currentHash,
packageVersion,
client,
progress,
updateInfo,
lastError,
restartApp,
} = useUpdate();
```
Types and functionality:
```ts
interface UpdateContext {
// Checks for updates (Note: Before v10.26.0, `checkUpdate` had no return value, you had to get it from `updateInfo` returned by `useUpdate()`)
// We still recommend getting `updateInfo` via `useUpdate()` primarily
checkUpdate: () => Promise;
// Called after download completes to immediately restart and switch to the new version
switchVersion: () => void;
// Called after download completes to switch to the new version on the next user-initiated restart (silent update)
switchVersionLater: () => void;
// Manually mark update as successful after a restart
markSuccess: () => void;
// Clear the last error state
dismissError: () => void;
// Download the update. Returns `boolean` in v10.16.0+, indicating success.
downloadUpdate: () => Promise;
// Download and install an APK
downloadAndInstallApk: (url: string) => Promise;
// Asynchronously get info about the currently applied update. Use `currentVersionInfo` instead after v10.31.2.
getCurrentVersionInfo: () => Promise<{
name?: string;
description?: string;
metaInfo?: string;
}>;
// Info about the currently applied update. Requires v10.31.2+.
currentVersionInfo: {
name?: string;
description?: string;
metaInfo?: string;
};
// Parse test QR code. Requires v10.11.2+
parseTestQrCode: (qrCode: string) => void;
// Current version hash
currentHash: string;
// Current native package version
packageVersion: string;
// Current Cresc service instance
client?: Cresc;
// Progress data after download starts
progress?: {
hash: string;
// Bytes downloaded
received: number;
// Total bytes to download
total: number;
};
// Update-related info
updateInfo?: {
// Already up-to-date
upToDate?: true;
// Native package expired, requires downloading a new native build
expired?: true;
// Native package download URL set in the admin console
downloadUrl?: string;
// Is there a new update?
update?: true;
// New update version name
name?: string;
// New update hash
hash?: string;
// Update description/changelog
description?: string;
// Extra metadata payload
metaInfo?: string;
// Is the update currently paused?
paused?:
| "app" // Paused for all native versions of the app
| "package" // Paused for this native version only
| "quota"; // Paused due to exceeding check quota
// Other messages
message?: string;
};
// The most recent error occurring during check, download, or apply
lastError?: Error;
}
```
***
#### async function checkUpdate()
Triggers an update check, returns `updateInfo` (Note: Before v10.26.0, `checkUpdate` had no return value. We still recommend prioritizing `updateInfo` from `useUpdate()`). There are three return scenarios:
1. `{expired: true}`: The native package has expired (3 cases: 1. Manually set as expired, 2. Manually deleted, 3. Never uploaded). You should prompt the user to download a new native build or redirect to the app store (requires setting `downloadUrl` in the web console). To update an APK inside the app, configure [install permissions](/docs/api.md#async-function-downloadandinstallapkurl).
```js
{
expired: true,
downloadUrl: 'http://appstore/downloadUrl',
}
```
2. `{upToDate: true}`: The app is currently up-to-date.
3. `{update: true}`: A new version is available. `name` and `description` can be shown to the user. `metaInfo` can be used to set custom flags (like whether to update silently, or if it's a mandatory update). See [Best Practices](/docs/bestpractice.md#using-meta-info) for details. It also contains download URLs.
```js
{
update: true,
name: '1.0.3-rc',
hash: 'hash',
description: 'Added Chat feature\nFixed store bugs',
metaInfo: '{"silent":true}',
pdiffUrl: 'https://cdn.example.com/hash',
diffUrl: 'https://cdn.example.com/hash',
}
```
***
#### async function downloadUpdate()
Downloads the hot update package. Only proceeds if `update:true`. Updates `progress` state. In v10.16.0+, returns `boolean` indicating success.
***
#### async function downloadAndInstallApk(url)
Downloads and directly installs an APK. `url` must point directly to the APK file.
Due to external factors like system security constraints, this is not guaranteed to succeed perfectly. If download/install fails during the app lifecycle, subsequent calls won't retry and fail silently.
Note: Requires manual permissions added to `AndroidManifest.xml`. If supporting pre-Android 7.0 devices, you also need external storage permissions.
```xml
```
Note that some app stores might reject your app due to these permissions. Removing them does not affect OTA update functionality.
***
#### function markSuccess()
**Generally, do not call this manually**. Marks the update as successfully applied (otherwise, the next boot expects a crash and rolls back).
***
#### async function getCurrentVersionInfo()
Gets information about the currently active hot update (returns an empty object if no update was applied). Use `currentVersionInfo` instead after v10.31.2.
Example return:
```js
{
name: '1.0.3-rc',
description: 'Added Chat feature\nFixed store bugs',
metaInfo: '{"silent":true}',
}
```
***
#### function restartApp()
Immediately restarts the application. Available in v10.28.2+.
***
#### function switchVersion()
Immediately restarts the app and loads the newly downloaded version.
> Warning! Do not rely solely on `progress` to determine download completion! Call this strictly after `await downloadUpdate()` finishes.
***
#### function switchVersionLater()
Loads the newly downloaded version on the next natural app restart.
> Warning! Call this strictly after `await downloadUpdate()` finishes.
***
#### function parseTestQrCode(qrCode: string)
Parses test QR codes, typically used by QA to test OTA packages. If your app already has a scanning feature, scan Cresc QRs to preview arbitrary update versions.
Note: If using custom update strategies, rely exclusively on `updateInfo` from `useUpdate()` because the QR code scan bypasses checkUpdate's return value.
When using this method, **do not** check the "Use Deep Link" option.
Example:
```js
{
// Disable camera upon read
setShowCamera(false);
// Parse test QR first
if (parseTestQrCode(codeStringValue)) {
// If it's a Cresc QR, stop processing
return;
}
// Otherwise, process normal business logic
}}
/>
```
***
### Android Methods
#### UpdateContext.setCustomInstanceManager(ReactInstanceManager instanceManager)
If integrating into an existing Android host app, pass your custom ReactInstanceManager here. Available since `v5.5.8`.
Example:
```java
import cn.reactnative.modules.update.UpdateContext
mReactInstanceManager = ReactInstanceManager.builder()
// ...other setters, but do NOT call setBundleAssetName
.setJSBundleFile(UpdateContext.getBundleUrl(mContext, "assets://index.android.bundle"))
.build();
UpdateContext.setCustomInstanceManager(mReactInstanceManager);
```
---
url: /docs/api-token.md
---
# API Token
An API Token is an authentication method used to invoke the [Cresc API](https://api.cresc.dev/openapi) within CI/CD pipelines or automated scripts. Compared to standard username/password logins, API Tokens are much more secure and easier to manage.
## Use Cases
- **Continuous Integration/Deployment (CI/CD)**: Automate OTA update publishing via GitHub Actions, GitLab CI, Jenkins, etc.
- **Automation Scripts**: Write scripts to manage apps, versions, or native packages in bulk.
- **Third-Party Integrations**: Wrap Cresc's workflows into external developer tools.
## Creating an API Token
1. Log into the [Cresc Dashboard](https://admin.cresc.dev)
2. Click on "API Token" in the left sidebar menu.
3. Click the "Create Token" button.
4. Enter a name for the Token (e.g., CI/CD Pipeline).
5. Select the required permissions.
6. (Optional) Set an expiration date.
7. Click Create, and **copy the secret Token immediately**.
:::warning
The token string is only displayed once upon creation. You will not be able to view it again. Be sure to save it safely immediately!
:::
## Permissions
| Permission | Description |
| ---------- | ---------------------------------------------------------------- |
| **Read** | View app details, version info, and native package details |
| **Write** | Create/Update apps, publish new versions, upload native packages |
| **Delete** | Delete apps, versions, and packages |
:::info
You must select at least one permission when creating a Token. Applying the principle of least privilege is a best practice.
:::
## Using Tokens with API
When calling the Cresc API, supply the token via the `x-api-token` HTTP header:
```bash
curl -X GET "https://api.cresc.dev/app/list" \
-H "x-api-token: YOUR_API_TOKEN"
```
### Using in the CLI
If you're using the `react-native-update-cli` tool (v2.7.0+), you can pass the Token via environment variables:
```bash
export CRESC_API_TOKEN=your_api_token_here
cresc bundle --platform android
```
### Using in CI/CD Environments
Here is an example configuring a GitHub Action:
```yaml
# .github/workflows/publish.yml
name: Publish Hot Update
on:
push:
branches: [main]
jobs:
publish:
runs-on: ubuntu-latest
steps:
- uses: actions/checkout@v4
- name: Setup Node.js
uses: actions/setup-node@v4
with:
node-version: '18'
- name: Install dependencies
run: npm install && npm i -g react-native-update-cli
- name: Publish update
env:
CRESC_API_TOKEN: ${{ secrets.CRESC_API_TOKEN }}
run: cresc bundle --platform android
```
:::tip
In CI/CD pipelines, always store your tokens securely using the platform's Secret Manager (e.g., GitHub Secrets) rather than hardcoding them in your configuration scripts.
:::
## Managing Tokens
### Viewing Token List
On the "API Token" page, you can view all created tokens, including:
- Token Name
- Permissions
- Expiration Time
- Last Used Time
- Status (Active/Expired/Revoked)
### Revoking a Token
If a token is leaked or no longer needed, you can revoke it at any time:
1. Identify the token in the table list.
2. Click the "Revoke" button.
3. Confirm revocation.
:::warning
Revocations take effect immediately. Any API requests made using a revoked token will be instantly rejected. Ensure you update any dependent CI/CD setups before revoking.
:::
## Security Practices
1. **Principle of Least Privilege**: Only grant the exact permissions required.
2. **Set Expirations**: Try to use short-lived tokens or configure expirations for temporary integration projects.
3. **Periodic Rotation**: Routinely revoke old tokens and cycle in new tokens for long-running workflows.
4. **Secure Storage**: Never commit tokens directly to your repository source code.
5. **Monitor Usage**: Check the 'Last Used Time' and delete idle tokens routinely.
## Limits
- Each user can create a maximum of **10** API Tokens.
- To create additional tokens, you must first revoke existing unused tokens.
---
url: /docs/cli.md
---
# CLI Tools (Built-in)
### Installation
```bash
$ npm install -g react-native-update-cli
```
### Commands
#### cresc bundle
Generates a hot update resource package (ppk). Automatically detects if frameworks like Expo or Taro are used and runs their packagers respectively. If detection is inaccurate or errors occur, try using `--rncli` to specify the official React Native CLI.
- `platform`: `ios|android` The target platform.
- `entryFile`: The entry script file.
- `intermediaDir`: Temporary file output directory.
- `output`: Final ppk file output path.
- `dev`: Whether to bundle a dev version.
- `sourcemap`: Whether to generate sourcemaps (requires CLI v1.11.0+).
- `no-interactive`: Disable interactive prompts.
- `rncli`: Force use of official RN CLI for bundling (requires CLI v1.40.0+).
- `expo`: Force use of Expo CLI for bundling (requires CLI v1.40.0+).
- `taro`: Force use of Taro CLI for bundling (requires CLI v1.40.0+).
Since v1.44.2, direct publishing arguments have been added (equivalent to calling `cresc publish` right after bundling finishes):
- `name`: Target name for the hot update version (its own version number).
- `description`: Update description/changelog shown to users.
- `metaInfo`: Custom meta info for saving arbitrary state data. Refer to [Best Practices](/docs/bestpractice.md#using-meta-info).
Since v1.46.1, alongside passing `name`, `description`, and `metaInfo`, you can stack the following arguments (equivalent to calling `cresc update` right after publishing):
- `packageId`: The target native package ID to bind to (Choose one).
- `packageVersion`: The target native package version to bind to (Choose one).
- `minPackageVersion`: Minimum target native package version. Applies to all inclusive versions above it (Choose one).
- `maxPackageVersion`: Maximum target native package version. Applies to all inclusive versions below it (Choose one).
- `packageVersionRange`: Target native package version range (Choose one). Range format strictly follows Semantic Versioning (semver). See [https://devhints.io/semver](https://devhints.io/semver).
Example:
```bash
cresc bundle --platform android --name "1.0.0" --description "Hot update version 1.0.0" --metaInfo '{"key": "value"}' --packageVersionRange ">=1.0 <3.0"
```
***
#### cresc parseIpa \[ipaFile]
Parses an `.ipa` file and outputs associated data like version codes and build timestamps.
***
#### cresc parseApk \[apkFile]
Parses an `.apk` file and outputs associated data like version codes and build timestamps.
***
#### cresc parseAab \[aabFile]
Parses an `.aab` file and outputs associated data like version codes and build timestamps.
***
#### cresc diff \[origin]\[next]
Provide two `.ppk` files to generate a delta differential hot update package from the origin to next versions.
- `output`: Diff file output path.
***
#### cresc diffFromApk \[apkFile]\[next]
Provide an `.apk` file and a `.ppk` file to generate a diff update package from the `.apk` baseline to the next version.
No need to run this manually if you use the managed platform.
- `output`: Diff file output path.
***
#### cresc diffFromIpa \[ipaFile]\[next]
Provide an `.ipa` file and a `.ppk` file to generate a diff update package.
No need to run this manually if you use the managed platform.
- `output`: Diff file output path.
***
#### cresc login \[email]\[pwd]
Logs into the hot update platform. You must authenticate to execute most subsequent commands.
***
#### cresc logout
Logs out and clears local session cache.
***
#### cresc me
Checks if you are currently logged in, and displays account details.
***
#### cresc createApp
Creates a new remote app and instantly binds it to the current project directory. This action can also be completed via the web dashboard.
- `platform`: `ios|android` The target platform.
- `name`: The application name.
- `downloadUrl`: The remote URL where users go to download native package upgrades.
***
#### cresc deleteApp \[appId]
Deletes an existing app entirely. All related native packages and hot versions will be permanently wiped. This action can also be completed via the web dashboard.
- `appId`: The App ID to delete.
***
#### cresc apps
List all established apps in your account. This action can also be completed via the web dashboard.
- `platform`: `ios|android` The target platform filter.
***
#### cresc selectApp \[appId]
Locally binds an existing app configuration to the current project folder.
- `platform`: `ios|android` The target platform.
***
#### cresc uploadIpa \[ipaFile]
Uploads an `.ipa` to the managed platform. (Requires CLI 1.24.0+)
***
#### cresc uploadApk \[apkFile]
Uploads an `.apk` to the managed platform. (Requires CLI 1.24.0+)
***
#### cresc uploadAab \[aabFile]
Uploads an `.aab` to the managed platform. (Requires CLI 2.6.0+)
***
#### cresc extractApk \[aabFile]
Extracts an `.apk` file from an `.aab` build envelope. (Requires CLI 2.6.0+)
***
#### cresc packages
View all natively uploaded packages. This action can also be completed via the web dashboard.
- `platform`: `ios|android` The target platform filter.
***
#### cresc deletePackage
Delete an uploaded native package baseline.
- `appId`: The App ID that the native package belongs to.
- `packageId`: The target Package ID to delete.
***
#### cresc publish \[ppkFile]
Uploads and publishes a new hot update package (`.ppk` file).
- `platform`: `ios|android`
- `name`: Target name for the hot update version (its own version code).
- `description`: Update description/changelog shown to users.
- `metaInfo`: Custom meta info payload. Refer to [Best Practices](/docs/bestpractice.md#using-meta-info).
Since v1.46.1, alongside publishing, you can stack the following arguments (equivalent to calling `cresc update` right after publishing):
- `packageId`: The target native package ID to bind to (Choose one).
- `packageVersion`: The target native package version to bind to (Choose one).
- `minPackageVersion`: Minimum target native package version. Applies to all inclusive versions above it (Choose one).
- `maxPackageVersion`: Maximum target native package version. Applies to all inclusive versions below it (Choose one).
- `packageVersionRange`: Target native package version range (Choose one). Range format strictly follows Semantic Versioning (semver). See [https://devhints.io/semver](https://devhints.io/semver).
Example:
```bash
cresc publish .cresc/output/android.1750423283653.ppk --platform android --name "1.0.0" --description "Hot update 1.0.0" --metaInfo '{"key": "value"}' --packageVersionRange ">=1.0 <3.0"
```
***
#### cresc versions
Paginates and lists available hot update versions. This action can also be completed via the web dashboard.
- `platform`: `ios|android`
***
#### cresc deleteVersion
Delete a specific published hot update version.
- `appId`: The App ID the target hot update version belongs to.
- `versionId`: The Target update Version ID to delete.
***
#### cresc update
Binds and applies an active hot update version to a native package baseline. This action can also be completed via the web dashboard. You must supply one of the package scope args: `packageId`, `packageVersion`, `minPackageVersion`, `maxPackageVersion`, or `packageVersionRange`.
From CLI v2.4.0 onward, a full rollout and a canary rollout can coexist simultaneously. Prior to 2.4.0 they overwrote each other depending on which was set last.
- `platform`: `ios|android`
- `versionId`: The Version ID of the hot update.
- `rollout`: Phased canary rollout percentage (Int between 1 - 100). Default is 100 (Requires CLI v1.31.0+).
- `dryRun`: Dry run preview only, prevents applying actual bindings (Requires CLI v1.45.4+).
- `packageId`: Target bind native package ID (Choose one).
- `packageVersion`: Target bind native package version string (Choose one, CLI v1.7.2+).
- `minPackageVersion`: Target minimum native package version (Choose one, CLI v1.27.0+).
- `maxPackageVersion`: Target maximum native package version (Choose one, CLI v1.27.0+).
- `packageVersionRange`: Target semantic version range string (Choose one, CLI v1.45.4+). Format follows SemVer.
Example:
```bash
❯ cresc update --versionId 211343 --platform android --packageVersionRange ">=1.0 <3.0" --dryRun
react-native-update-cli: 1.45.4 (Latest: 1.45.4)
react-native-update: 10.28.11 (Latest: 10.28.11)
The following is a dry-run simulation and no destructive changes will occur:
Successfully bound update 211343 to native baseline 1.28.1 (id: 75219)
Successfully bound update 211343 to native baseline 1.28 (id: 75184)
Successfully bound update 211343 to native baseline 1.5 (id: 73396)
Successfully bound update 211343 to native baseline 2.0 (id: 68219)
Successfully bound update 211343 to native baseline 1.0 (id: 68158)
Operation complete, 5 active native packages bound.
```
---
url: /docs/cli_module.md
---
# CLI Tools (Custom Modules)
## Module System
Since version v2.0.0, the CLI supports modular extensions, enabling developers to customize commands and workflows.
### Core Architecture
- **CLI Module**: A self-contained module encompassing your custom commands and workflows.
- **Command**: A single, executable ad-hoc terminal command.
- **Workflow**: Complex, stateful action flows composed of chronological steps.
- **Module Manager**: The underlying component framework that hooks modules and executes them.
### Registering Modules
```typescript
import { moduleManager } from 'react-native-update-cli';
import { myCustomModule } from './my-custom-module';
// Register a customized module
moduleManager.registerModule(myCustomModule);
```
### Developing Custom Modules
```typescript
import type { CLIModule, CommandContext, CommandResult } from 'react-native-update-cli';
export const myCustomModule: CLIModule = {
name: 'my-module',
version: '1.0.0',
commands: [
{
name: 'my-command',
description: 'My custom command',
handler: async (context: CommandContext): Promise => {
// Execute arbitrary logic
return { success: true, data: 'Hello from custom command!' };
},
options: {
flag: {
hasValue: true,
description: 'Custom Flag Parameter'
}
}
}
],
workflows: [
{
name: 'my-workflow',
description: 'My custom workflow process',
steps: [
{
name: 'step1',
description: 'Step One initialization',
execute: async (context: CommandContext) => {
console.log('Executing step 1...');
return { step1Result: 'completed' };
}
},
{
name: 'step2',
description: 'Step Two execution',
execute: async (context: CommandContext, previousResult: any) => {
console.log('Executing step 2. Input from previous step:', previousResult);
return { ...previousResult, step2Result: 'completed' };
}
}
]
}
],
init: (provider) => {
console.log('Custom Module initialized');
}
};
```
### Review Created Commands
```bash
# List all currently recognized module commands
cresc list
```
***
## Workflow System
Workflows manage the complicated end-to-end task flows consisting of distinct states. They support conditional execution thresholds, standardized error handling, and robust data propagation parameters.
### Built-in Workflows
#### 1. User Authentication Flow
##### cresc auth-check
Verifies current user authentication conditions.
```bash
cresc workflow auth-check
```
##### cresc login-flow
Complete end-to-end CLI dashboard login procedure.
```bash
cresc workflow login-flow
```
#### 2. Cross-Platform App Management Flows
##### cresc workflow multi-platform-app-management
Consolidated unified oversight over multi-platform apps.
```bash
cresc workflow multi-platform-app-management
```
##### cresc workflow incremental-build
Executes an incremental build generation to assemble partial/delta updates.
```bash
cresc workflow incremental-build
```
### Workflow Utilities
Lists all available workflow suites dynamically.
```bash
cresc list
```
##### cresc workflow
Perform a specified dynamic workflow sequence.
```bash
cresc workflow
```
##### cresc list
Lists the full set of registered modules framework-wide.
```bash
cresc list
```
### Workflow Features
1. **Procedural Execution**: Handfuls of workflow steps fire strictly in chronological sequences.
2. **Context Passing**: Each node's returned result can be passed into subsequent execution nodes.
3. **Conditional Thresholds**: Execution nodes can dynamically route execution based on conditions.
4. **Error Handling**: Standardized rollback mechanism handles exceptions robustly.
5. **Realtime Feedback**: Visually monitors stage progress metrics via STDERR streaming.
6. **Input Validation**: Required parameter variables are strictly schema-verified before execution paths begin.
***
## Example Repository
Explore an assortment of complete modules and robust workflows documented thoroughly via code samples within the `example/` directory folder:
- `example/modules/` - Basic Module instantiation guides.
- `example/workflows/` - Elaborate Workflow architecture samples.
- `example/scripts/` - TypeScript command triggers for CI tooling.
To exercise the sandbox scripts directly:
```bash
# Registering and triggering simple module tests
npx ts-node example/scripts/register-modules.ts
# Boot up the testing workflow sandbox
npx ts-node example/scripts/workflow-demo.ts
# Run the complex stateful workflow test
npx ts-node example/scripts/enhanced-workflow-demo.ts
```
---
url: /docs/bestpractice.md
---
# Best Practices
#### Optimizing Native and Hot Update Package Size
##### iOS Native Package Optimization (ipa)
For the same archive (where version number, build time, and bundled js are fixed and unaffected by the export method), you can export the ipa multiple times with different options and choose the smallest one to upload to the Cresc server as your update baseline.
##### Android Native Package Optimization (apk)
APK optimization primarily focuses on two areas:
- [Enable Proguard to obfuscate and shrink code](https://reactnative.dev/docs/signed-apk-android#enabling-proguard-to-reduce-the-size-of-the-apk-optional). Note that this step might cause runtime errors for code using reflection. Exhaustive testing is required after enabling, and you might need to add specific Proguard rules for third-party libraries.
- [Build separate APKs for different CPU architectures](https://reactnative.dev/docs/signed-apk-android#building-separate-apks-for-different-cpu-architectures-optional). Find the CPU architecture section in `android/app/build.gradle` and enable the `enableSeparateBuildPerCPUArchitecture` option as shown below:
```diff
splits {
abi {
reset()
- enable enableSeparateBuildPerCPUArchitecture
+ enable true // Enable separate CPU architecture builds
universalApk false // If true, also generate a universal APK
}
}
```
This will output multiple APK files in the build directory. For distribution and uploading to the hot update service, you only need to use the `app-arm64-v8a-release.apk` file, which significantly reduces the APK size.
##### Hot Update Package Optimization (ppk)
The primary content of a hot update package is the JS bundle and its referenced static assets (mostly images).
- **JS Bundle Analysis**: You can use third-party tools (like [react-native-bundle-visualizer](https://github.com/IjzerenHein/react-native-bundle-visualizer)) to analyze which modules consume the most space in your JS files, and see if they can be replaced with lighter alternatives (e.g., replacing `moment` with `dayjs`, or `lodash` with `lodash-es`).
- **Image Optimization**:
- Use compression tools to crop and compress images without noticeable quality loss.
- If transparent pixels aren't needed, consider converting PNG formats to JPG.
- Consider image formats with higher compression ratios, such as WEBP (requires third-party native plugins like [react-native-webp-format](https://github.com/Aleksefo/react-native-webp-format#readme)) or HEIF (supported natively on iOS 11 and Android 10+). Here is an image format comparison for reference: [https://compare.rokka.io/\_compare/#heif=40\&jpeg=80\&webp=80\&av1=40\&width=800](https://compare.rokka.io/_compare/#heif=40\&jpeg=80\&webp=80\&av1=40\&width=800).
#### Handling Multiple Channel APKs for Hot Updates
1. If the channel APKs have differences in their `JS code or initial assets` (no matter how slight, which results in different jsbundles), you must build separate APKs, upload, and bind them individually. You can write scripts to automate bulk operations using the CLI.
2. If the `JS code and initial assets` across channel APKs are perfectly identical, consider using [Flavor builds](https://developer.android.com/studio/build/build-variants), or other dynamic channel generation tools (like [Tencent's VasDolly](https://github.com/Tencent/VasDolly) or [Meituan's walle](https://github.com/Meituan-Dianping/walle)). In this approach, all channel APKs are generated from a single base APK (thus sharing the same build timestamp and jsbundle). This means you only need to upload one base APK, and hot updates applied to it will take effect across all channel APKs.
3. If you are on the `Premium` tier or above, you can enable `Ignore Build Timestamp` in your app settings in the admin dashboard. This option only checks the version number and ignores the timestamp, providing a wider tolerance for updates, but it may consume more CDN traffic.
#### Supporting the AAB Format
Update the `react-native-update-cli` to v2.6.0 or higher. You can then use the `cresc parseAab` and `cresc uploadAab` commands for `.aab` format support.
#### Testing and Rollbacks
Starting from version v10.11.2, you can use two quick QR code scanning methods to test hot updates without needing to bind them beforehand:

- **If your app has [Deep Linking](https://reactnative.dev/docs/linking#enabling-deep-links) enabled:**
No code changes are required. Simply check "Use Deep Link" in the interface shown above, enter your app's scheme (e.g., `cresc://`), and scan the QR code using your system camera or a standard QR scanner that supports deep links. The app will automatically open and trigger the update.
- **If your app has a built-in barcode scanner:**
Please refer to the documentation for the [parseTestQrCode](/docs/api.md#function-parsetestqrcodeqrcode-string) method.
Enable the `Use Deep Link` option in the dashboard and enter the custom URL scheme you configured for the app.
If the release has just been uploaded, give the backend a short moment to prepare the test payload before scanning the QR code.
:::info
If you implement a custom update UI, read the update state from `useUpdate()` instead of trying to parse the deep-link payload yourself.
:::
### Disabling Android Image Crunch Operations
Android can automatically reprocess PNG assets during release builds. That makes binary diffs less predictable and can unnecessarily increase package size. Disable `crunchPngs` in the release build type:
```groovy
// In android/app/build.gradle
android {
// ...
signingConfigs {
// ...
}
buildTypes {
release {
// ...
crunchPngs false
}
}
}
```
### Login & Creating Applications
Create an account and sign in at [admin.cresc.dev](https://admin.cresc.dev), then use the CLI to authenticate locally:
```bash
$ cresc login
email: you@example.com
password: your-password
```
The CLI stores working state in a local `.update` directory. Add `.update` to your `.gitignore` so temporary metadata does not enter source control.
Then create or select the app records that match your iOS and Android packages:
```bash
$ cresc createApp --platform ios
App Name: My App iOS
$ cresc createApp --platform android
App Name: My App Android
```
:::info
Keep the names distinct if you manage iOS and Android separately.
:::
If the app records already exist, select them locally instead:
```bash
$ cresc selectApp --platform ios
1) Nemo Fish (ios)
2) Catch Wealth (ios)
Total 2 ios apps
Enter appId: 1
```
This writes `update.json` into your project:
```bash
{
"ios": {
"appId": 1,
"appKey": ""
},
"android": {
"appId": 2,
"appKey": ""
}
}
```
Commit `update.json` so the app can resolve the correct `appKey` during builds.
At this point you are ready for [Code Integration](/docs/integration.md).
---
url: /docs/integration.md
---
# Code Integration
Once installation and native configuration are complete, the next step is wiring Cresc into your app code.
### Retrieve your `appKey`
Each platform uses its own `appKey`. The value is stored in `update.json`, which is created by `cresc createApp` or `cresc selectApp`.
```javascript
import { Platform } from "react-native";
import _updateConfig from "./update.json";
const { appKey } = _updateConfig[Platform.OS];
```
You can also find the `appKey` in the Cresc dashboard.
### Initialize the client
```js
import { UpdateProvider, Cresc } from "react-native-update";
const crescClient = new Cresc({
appKey,
// Updates are skipped in development by default.
// Set debug: true if you want to test update checks in development.
// Applying the patch still requires a release build.
// debug: true,
});
export default function Root() {
return (
);
}
```
After this, the default OTA flow already works. Cresc can check for updates and show the built-in alert flow automatically.
### Choose your check strategy
`checkStrategy` controls **when** Cresc checks for updates:
- `"both"`: Check on cold start and when the app returns from background.
- `"onAppStart"`: Check only on cold start.
- `"onAppResume"`: Check only when resuming from background.
- `null`: Disable automatic checks and call `checkUpdate()` yourself.
```js
const crescClient = new Cresc({
appKey,
checkStrategy: "onAppStart",
});
```
### Choose your update strategy
`updateStrategy` controls **how** Cresc handles an available update:
- `"alwaysAlert"`: Always show the default update alert flow.
- `"alertUpdateAndIgnoreError"`: Show the default alert flow and ignore download errors in the UI.
- `"silentAndNow"`: Download silently and switch immediately after the update is ready.
- `"silentAndLater"`: Download silently and apply on a later restart.
- `null`: Disable the built-in UI so you can build the full experience yourself.
```js
const crescClient = new Cresc({
appKey,
updateStrategy: "silentAndLater",
});
```
### Build a custom update UI
If you want full control over the UI, disable the built-in update strategy and use `useUpdate()`:
```js
const crescClient = new Cresc({
appKey,
updateStrategy: null,
debug: true,
});
```
Example:
```js
import { useState } from "react";
import { Text, View, TouchableOpacity } from "react-native";
import { Banner, Icon, Snackbar } from "react-native-paper";
import { useUpdate } from "react-native-update";
function App() {
const {
checkUpdate,
downloadUpdate,
switchVersionLater,
switchVersion,
updateInfo,
progress: { received, total } = {},
} = useUpdate();
const [showUpdateBanner, setShowUpdateBanner] = useState(false);
const [showUpdateSnackbar, setShowUpdateSnackbar] = useState(false);
const snackbarVisible = showUpdateSnackbar && updateInfo?.update;
return (
Download progress: {received} / {total}
{
checkUpdate();
setShowUpdateSnackbar(true);
}}
>
Check for updates
{snackbarVisible && (
{
setShowUpdateSnackbar(false);
}}
action={{
label: "Update",
onPress: async () => {
setShowUpdateSnackbar(false);
if (await downloadUpdate()) {
setShowUpdateBanner(true);
}
},
}}
>
Update {updateInfo.name} is available.
)}
{
switchVersionLater();
setShowUpdateBanner(false);
},
},
]}
icon={({ size }) => (
)}
>
The update has finished downloading.
);
}
```
### Understand the `updateInfo` states
After `checkUpdate()`, Cresc exposes state through `useUpdate()`:
1. `{ expired: true }`: The installed native baseline is no longer valid. Prompt the user to install a newer native build if needed.
2. `{ upToDate: true }`: No OTA update is currently available.
3. `{ update: true }`: An OTA update is available. Use `name`, `description`, `metaInfo`, and the download flow to drive your UI.
When `updateInfo.update` is true, call `downloadUpdate()` and wait for it to resolve before assuming the patch is ready. The `progress` fields are useful for UI, but the promise result is the reliable completion signal.
### Forward OTA analytics into your own tools
Use the `logger` option if you want to pipe update events into your analytics system:
```ts
import { getAnalytics, logEvent } from "firebase/analytics";
const analytics = getAnalytics();
const crescClient = new Cresc({
appKey,
logger: ({ type, data }) => {
logEvent(analytics, "cresc_" + type, data);
},
});
```
### Continue
- [API reference](/docs/api.md)
- [Best practices](/docs/bestpractice.md)
- [Publishing hot updates](/docs/publish.md)
---
url: /docs/publish.md
---
# Publishing Hot Updates
Now that your app can detect updates, let's learn how to publish and update it. See the flow below:
```mermaid
flowchart TD
codebase["Code Source Repository"]
user["Users with matching native baseline version"]
subgraph nativeRelease["Publishing Native Baseline Version"]
tagNativeVersion["Tag Native Version in git"]
nativePackage["Native Full Package (apk or ipa)"]
newNativeVersion["New Native Baseline Version"]
tagNativeVersion -->|"Compile"| nativePackage
nativePackage -->|"Upload with cresc uploadApk/uploadIpa"| newNativeVersion
end
subgraph hotUpdateRelease["Publishing Hot Update Version"]
tagBundleVersion["Tag Hot Update Version in git"]
bundlePackage["JS Code and Assets (.ppk file)"]
someNativeVersions["One or more Native Baseline Versions"]
tagBundleVersion -->|"Generate with cresc bundle"| bundlePackage
bundlePackage -->|"Bind"| someNativeVersions
end
codebase -->|"Modify JS code, JS components, or JS assets"| hotUpdateRelease
codebase -->|"Modify native code, native settings, or native assets"| nativeRelease
hotUpdateRelease -->|"Push incremental hot update (.diff file)"| user
```
1. We first need to build a native release version. Before building, ensure `react-native-update` is integrated, tested, and works correctly. For Android, [disable `crunchPngs`](/docs/getting-started.md#disabling-android-image-crunch-operations). See documentation for [iOS Build](https://reactnative.dev/docs/publishing-to-app-store) and [Android Build](https://reactnative.dev/docs/signed-apk-android). After building, run `cresc uploadIpa` or `cresc uploadApk` to upload the package to Cresc servers to serve as the baseline for delta comparisons. Keep a copy of this installation package; the package distributed to users `must be strictly identical` to the uploaded one. We recommend using git tags for native versioning (e.g., `v1.0.0`).
2. Iterate on your business logic over the baseline (add/remove JS code, static assets). Run `cresc bundle` to generate and publish a hot update without recompiling the native app. We recommend using git tags for hot update versioning (e.g., `v1.0.1`).
3. If there are native changes during iteration, you must publish and upload a new native baseline version (repeat step 1, but set a different native version number). You can maintain just one native baseline or multiple versions concurrently.
## Publishing Native Baseline Version
### iOS
Refer to [Running On Device](https://reactnative.dev/docs/running-on-device) to ensure you are using the offline bundle.
Follow the standard flow to archive the `.ipa` file:
1. In Xcode, select a real device or Generic iOS Device.
2. Go to Product - Archive.
3. After Archiving, select `Export` to generate the .ipa file.
4. Run the following command to upload it:
```bash
$ cresc uploadIpa
```
The `CFBundleShortVersionString` in `ios/[project]/Info.plist` will be recorded as the `packageVersion`.
You can now upload this version to the App Store, or test it on devices via TestFlight. Note: Testing hot updates directly via Xcode is not supported yet.
If you re-archive later (e.g., modifying native code/configs), you must **change the version number**, and `uploadIpa` again. Otherwise, identically versioned native packages will [fail to receive hot updates due to mismatched build timestamps](/docs/faq.md#error-hot-update-paused-reason-build-timestamp-mismatch).
### Android
Set up signing per [Android Signed APK](https://reactnative.dev/docs/signed-apk-android). Run `./gradlew assembleRelease` or `./gradlew aR` in the `android` folder. The APK will be under `android/app/build/outputs/apk/release/app-release.apk`.
Upload it via:
```bash
$ cresc uploadApk android/app/build/outputs/apk/release/app-release.apk
# If you build an .aab package, use:
# cresc uploadAab android/app/build/outputs/bundle/release/app-release.aab
```
The `versionName` in `android/app/build.gradle` is recorded as the `packageVersion`.
You can now publish this version to app markets or install it directly for testing.
If you rebuild native code later, you must **change the version number**, and `uploadApk` again. Otherwise, [hot updates will fail due to build timestamp mismatches](/docs/faq.md#error-hot-update-paused-reason-build-timestamp-mismatch).
## Publishing Hot Update Version
Modify a line of code, and run `cresc bundle --platform ` to generate a new hot update version.
:::info
If you use frameworks without `index.js` like modern `expo`, the `bundle` command will fail. Manually create an `index.js` file importing the framework's entry file, referring to `main` in `package.json`. For `expo`, `index.js` looks like:
```js
import "expo-router/entry";
```
:::
```bash
$ cresc bundle --platform android
Bundling with React Native version: 0.22.2
Bundled saved to: build/output/android.1459850548545.ppk
Would you like to publish it?(Y/N)
```
Input Y to upload immediately, or run `cresc publish --platform android build/output/android.1459850548545.ppk` later.
```
Uploading [========================================================] 100% 0.0s
Enter version name:
Enter description:
Enter meta info: {"ok":1}
Ok.
Would you like to bind packages to this version?(Y/N)
```
The version is stored on the server, but users cannot see it until you bind native packages to it.
Input Y to bind immediately, or run `cresc update --platform ` later to bind previously uploaded versions. You can also drag and drop native versions to matching hot updates on the web dashboard.
```
┌────────────┬──────────────────────────────────────┐
│ Package Id │ Version │
├────────────┼──────────────────────────────────────┤
│ 46272 │ 2.0(normal) │
├────────────┼──────────────────────────────────────┤
│ 45577 │ 1.0(normal) │
└────────────┴──────────────────────────────────────┘
Total 2 packages
Enter package id: 46272
```
After binding, the server takes a few seconds to generate diff patches, and clients will receive updates.
To publish new updates thereafter, repeatedly run `cresc bundle` without recompiling native code.
Congratulations! You have completed the hot update integration.
## Canary Release (Gradual Rollout)
Canary releases mitigate risk by gradually expanding the update scope to test stability.
### What is a Canary Release?
Before pushing updates globally, you push them to a small subset (e.g., 5%, 10%) of users, observe their metrics, and gradually widen the scope to 100%.
### Benefits
- **Lower Risk**: Bugs only affect small subsets, enabling swift rollbacks.
- **Verify Stability**: Observe performance across varied real-world networking environments.
- **Smooth Transitions**: Prevents severe server CPU usage spikes during mass updates.
- **Fast Recovery**: Halts rollouts immediately minimizing global impact.
### How it Works
When you configure a canary percentage (e.g., 10%), update queries calculate a hash using the device's UUID:
- Users within the bucket receive the newest updates.
- Users outside receive the previous full version or no update.
- The hash remains stable; multiple checks won't flip a user's bucket state.
### Usage
#### Web Dashboard
1. Log into the Cresc Dashboard.
2. Select App and Native Version.
3. Click "Publish".
4. Adjust the rollout percentage.
#### Command Line
Review the [rollout parameter in the CLI docs](/docs/cli.md#cresc-update).
### Notes
:::warning
**Important**: Canary versions form independent bindings with Native packages.
:::
- **One Canary Version At A Time**: Each Native Version can bind to one Canary update (\<100%) and one Full update concurrently.
- **Priority**: Users inside the canary bucket receive the canary update. Others receive the Full update.
- **Promoting to Full**: Bumping the percentage to 100% promotes the canary to a full release automatically, replacing any older full releases.
- **Client Requirements**: Features require `react-native-update` >= 10.32.0.
---
url: /docs/api.md
---
# API Reference
### JavaScript Methods
#### new Cresc(options: CrescOptions)
Creates a Cresc OTA service instance, with the following constructor parameters:
```ts
interface CrescOptions {
// Required, obtained via cresc createApp/selectApp command or the admin panel
appKey: string;
// Custom log output, can also be used to report analytics
logger?: ({ type, data }: { type: EventType; data: EventData }) => void;
// Strategy for automatically checking updates
checkStrategy?:
| "onAppStart" // Only when app starts
| "onAppResume" // Only when app switches from background to foreground
| "both"; // Default, includes both scenarios
| null; // Do not check for updates automatically, must call checkUpdate manually. Requires v10.4.2+
// Strategy for downloading and applying updates automatically
updateStrategy?:
| "alwaysAlert" // Default in __DEV__, uses system alert to prompt update and show errors
| "alertUpdateAndIgnoreError" // Default in production, prompts update using system alert, but suppresses error alerts
| "silentAndNow" // Automatically downloads silently and applies immediately
| "silentAndLater"; // Automatically downloads silently, but applies only after the user restarts the app
| null; // Do not download and apply automatically. Choose this if you need a custom UI.
// Whether to automatically mark as successful after rebooting from an update, default: true
// Manually marking is generally not recommended
autoMarkSuccess?: boolean;
// Whether to clear the last error after several ms, default: do not clear
dismissErrorAfter?: number;
// Whether to check for updates in the development environment, default: false. Enable this if you need to debug OTA in dev.
// Even if enabled, it can only check and download updates, but cannot actually apply them. Applying updates requires a release build.
// Requires v10.4.2+
debug?: boolean;
// Whether to throw an error when calling checkUpdate and downloadUpdate, default: false (get error info via lastError)
// When enabled, you can use try/catch blocks. lastError will still be available.
// try {
// await checkUpdate();
// } catch (e) {
// console.error(e);
// }
// Requires v10.15.2+
throwError?: boolean;
// Executed before checking for updates, returning false cancels the check
// Requires v10.12.0+
beforeCheckUpdate?: () => Promise;
// Executed before downloading updates, returning false cancels the download. Can be used with custom metaInfo for flow control.
// Requires v10.12.0+
beforeDownloadUpdate?: (info: UpdateInfo) => Promise;
// Executed after downloading updates, returning false stops the built-in strategy.
// Requires v10.27.0+
afterDownloadUpdate?: (info: UpdateInfo) => Promise;
// Executed when the native package is expired, returning false stops the built-in strategy.
// Requires v10.28.2+
onPackageExpired?: (info: UpdateInfo) => Promise;
}
// Log event types
type EventType =
// Update failed, rolled back after reboot
| "rollback"
// Error during check
| "errorChecking"
// Initiating check
| "checking"
// Downloading update
| "downloading"
// Download successful
| "downloadSuccess"
// Update failed
| "errorUpdate"
// Update success
| "markSuccess"
// Downloading APK
| "downloadingApk"
// User rejected storage permission before downloading APK
| "rejectStoragePermission"
// Error requesting storage permission
| "errorStoragePermission"
// Error while downloading/installing APK
| "errorDownloadAndInstallApk";
// Log event data
interface EventData {
// Hash of the current completed update, empty string if no update applied
currentVersion: string;
// Client version info
cInfo: {
rnu: string; // react-native-update version
rn: string; // react-native version
os: string; // OS and version
uuid: string; // User identifier
};
// Native package version
packageVersion: string;
// Build timestamp
buildTime: number;
// Error related info
message?: string;
// Hash of the rolled-back version
rolledBackVersion?: string;
// Hash of the failed new version
newVersion?: string;
// Additional data
[key: string]: any;
}
```
#### useUpdate()
Utility functions for OTA updates. This method can also be imported using the alias `useCresc`.
:::info
Note that `useUpdate` cannot be called directly inside the component that uses `` (typically the root component). It can only be called by its children.
:::
```js
const {
checkUpdate,
switchVersion,
switchVersionLater,
markSuccess,
dismissError,
downloadUpdate,
downloadAndInstallApk,
getCurrentVersionInfo,
currentVersionInfo,
parseTestQrCode,
currentHash,
packageVersion,
client,
progress,
updateInfo,
lastError,
restartApp,
} = useUpdate();
```
Types and functionality:
```ts
interface UpdateContext {
// Checks for updates (Note: Before v10.26.0, `checkUpdate` had no return value, you had to get it from `updateInfo` returned by `useUpdate()`)
// We still recommend getting `updateInfo` via `useUpdate()` primarily
checkUpdate: () => Promise;
// Called after download completes to immediately restart and switch to the new version
switchVersion: () => void;
// Called after download completes to switch to the new version on the next user-initiated restart (silent update)
switchVersionLater: () => void;
// Manually mark update as successful after a restart
markSuccess: () => void;
// Clear the last error state
dismissError: () => void;
// Download the update. Returns `boolean` in v10.16.0+, indicating success.
downloadUpdate: () => Promise;
// Download and install an APK
downloadAndInstallApk: (url: string) => Promise;
// Asynchronously get info about the currently applied update. Use `currentVersionInfo` instead after v10.31.2.
getCurrentVersionInfo: () => Promise<{
name?: string;
description?: string;
metaInfo?: string;
}>;
// Info about the currently applied update. Requires v10.31.2+.
currentVersionInfo: {
name?: string;
description?: string;
metaInfo?: string;
};
// Parse test QR code. Requires v10.11.2+
parseTestQrCode: (qrCode: string) => void;
// Current version hash
currentHash: string;
// Current native package version
packageVersion: string;
// Current Cresc service instance
client?: Cresc;
// Progress data after download starts
progress?: {
hash: string;
// Bytes downloaded
received: number;
// Total bytes to download
total: number;
};
// Update-related info
updateInfo?: {
// Already up-to-date
upToDate?: true;
// Native package expired, requires downloading a new native build
expired?: true;
// Native package download URL set in the admin console
downloadUrl?: string;
// Is there a new update?
update?: true;
// New update version name
name?: string;
// New update hash
hash?: string;
// Update description/changelog
description?: string;
// Extra metadata payload
metaInfo?: string;
// Is the update currently paused?
paused?:
| "app" // Paused for all native versions of the app
| "package" // Paused for this native version only
| "quota"; // Paused due to exceeding check quota
// Other messages
message?: string;
};
// The most recent error occurring during check, download, or apply
lastError?: Error;
}
```
***
#### async function checkUpdate()
Triggers an update check, returns `updateInfo` (Note: Before v10.26.0, `checkUpdate` had no return value. We still recommend prioritizing `updateInfo` from `useUpdate()`). There are three return scenarios:
1. `{expired: true}`: The native package has expired (3 cases: 1. Manually set as expired, 2. Manually deleted, 3. Never uploaded). You should prompt the user to download a new native build or redirect to the app store (requires setting `downloadUrl` in the web console). To update an APK inside the app, configure [install permissions](/docs/api.md#async-function-downloadandinstallapkurl).
```js
{
expired: true,
downloadUrl: 'http://appstore/downloadUrl',
}
```
2. `{upToDate: true}`: The app is currently up-to-date.
3. `{update: true}`: A new version is available. `name` and `description` can be shown to the user. `metaInfo` can be used to set custom flags (like whether to update silently, or if it's a mandatory update). See [Best Practices](/docs/bestpractice.md#using-meta-info) for details. It also contains download URLs.
```js
{
update: true,
name: '1.0.3-rc',
hash: 'hash',
description: 'Added Chat feature\nFixed store bugs',
metaInfo: '{"silent":true}',
pdiffUrl: 'https://cdn.example.com/hash',
diffUrl: 'https://cdn.example.com/hash',
}
```
***
#### async function downloadUpdate()
Downloads the hot update package. Only proceeds if `update:true`. Updates `progress` state. In v10.16.0+, returns `boolean` indicating success.
***
#### async function downloadAndInstallApk(url)
Downloads and directly installs an APK. `url` must point directly to the APK file.
Due to external factors like system security constraints, this is not guaranteed to succeed perfectly. If download/install fails during the app lifecycle, subsequent calls won't retry and fail silently.
Note: Requires manual permissions added to `AndroidManifest.xml`. If supporting pre-Android 7.0 devices, you also need external storage permissions.
```xml
```
Note that some app stores might reject your app due to these permissions. Removing them does not affect OTA update functionality.
***
#### function markSuccess()
**Generally, do not call this manually**. Marks the update as successfully applied (otherwise, the next boot expects a crash and rolls back).
***
#### async function getCurrentVersionInfo()
Gets information about the currently active hot update (returns an empty object if no update was applied). Use `currentVersionInfo` instead after v10.31.2.
Example return:
```js
{
name: '1.0.3-rc',
description: 'Added Chat feature\nFixed store bugs',
metaInfo: '{"silent":true}',
}
```
***
#### function restartApp()
Immediately restarts the application. Available in v10.28.2+.
***
#### function switchVersion()
Immediately restarts the app and loads the newly downloaded version.
> Warning! Do not rely solely on `progress` to determine download completion! Call this strictly after `await downloadUpdate()` finishes.
***
#### function switchVersionLater()
Loads the newly downloaded version on the next natural app restart.
> Warning! Call this strictly after `await downloadUpdate()` finishes.
***
#### function parseTestQrCode(qrCode: string)
Parses test QR codes, typically used by QA to test OTA packages. If your app already has a scanning feature, scan Cresc QRs to preview arbitrary update versions.
Note: If using custom update strategies, rely exclusively on `updateInfo` from `useUpdate()` because the QR code scan bypasses checkUpdate's return value.

When using this method, **do not** check the "Use Deep Link" option.
Example:
```js
{
// Disable camera upon read
setShowCamera(false);
// Parse test QR first
if (parseTestQrCode(codeStringValue)) {
// If it's a Cresc QR, stop processing
return;
}
// Otherwise, process normal business logic
}}
/>
```
***
### Android Methods
#### UpdateContext.setCustomInstanceManager(ReactInstanceManager instanceManager)
If integrating into an existing Android host app, pass your custom ReactInstanceManager here. Available since `v5.5.8`.
Example:
```java
import cn.reactnative.modules.update.UpdateContext
mReactInstanceManager = ReactInstanceManager.builder()
// ...other setters, but do NOT call setBundleAssetName
.setJSBundleFile(UpdateContext.getBundleUrl(mContext, "assets://index.android.bundle"))
.build();
UpdateContext.setCustomInstanceManager(mReactInstanceManager);
```
---
url: /docs/api-token.md
---
# API Token
An API Token is an authentication method used to invoke the [Cresc API](https://api.cresc.dev/openapi) within CI/CD pipelines or automated scripts. Compared to standard username/password logins, API Tokens are much more secure and easier to manage.
## Use Cases
- **Continuous Integration/Deployment (CI/CD)**: Automate OTA update publishing via GitHub Actions, GitLab CI, Jenkins, etc.
- **Automation Scripts**: Write scripts to manage apps, versions, or native packages in bulk.
- **Third-Party Integrations**: Wrap Cresc's workflows into external developer tools.
## Creating an API Token
1. Log into the [Cresc Dashboard](https://admin.cresc.dev)
2. Click on "API Token" in the left sidebar menu.
3. Click the "Create Token" button.
4. Enter a name for the Token (e.g., CI/CD Pipeline).
5. Select the required permissions.
6. (Optional) Set an expiration date.
7. Click Create, and **copy the secret Token immediately**.
:::warning
The token string is only displayed once upon creation. You will not be able to view it again. Be sure to save it safely immediately!
:::
## Permissions
| Permission | Description |
| ---------- | ---------------------------------------------------------------- |
| **Read** | View app details, version info, and native package details |
| **Write** | Create/Update apps, publish new versions, upload native packages |
| **Delete** | Delete apps, versions, and packages |
:::info
You must select at least one permission when creating a Token. Applying the principle of least privilege is a best practice.
:::
## Using Tokens with API
When calling the Cresc API, supply the token via the `x-api-token` HTTP header:
```bash
curl -X GET "https://api.cresc.dev/app/list" \
-H "x-api-token: YOUR_API_TOKEN"
```
### Using in the CLI
If you're using the `react-native-update-cli` tool (v2.7.0+), you can pass the Token via environment variables:
```bash
export CRESC_API_TOKEN=your_api_token_here
cresc bundle --platform android
```
### Using in CI/CD Environments
Here is an example configuring a GitHub Action:
```yaml
# .github/workflows/publish.yml
name: Publish Hot Update
on:
push:
branches: [main]
jobs:
publish:
runs-on: ubuntu-latest
steps:
- uses: actions/checkout@v4
- name: Setup Node.js
uses: actions/setup-node@v4
with:
node-version: '18'
- name: Install dependencies
run: npm install && npm i -g react-native-update-cli
- name: Publish update
env:
CRESC_API_TOKEN: ${{ secrets.CRESC_API_TOKEN }}
run: cresc bundle --platform android
```
:::tip
In CI/CD pipelines, always store your tokens securely using the platform's Secret Manager (e.g., GitHub Secrets) rather than hardcoding them in your configuration scripts.
:::
## Managing Tokens
### Viewing Token List
On the "API Token" page, you can view all created tokens, including:
- Token Name
- Permissions
- Expiration Time
- Last Used Time
- Status (Active/Expired/Revoked)
### Revoking a Token
If a token is leaked or no longer needed, you can revoke it at any time:
1. Identify the token in the table list.
2. Click the "Revoke" button.
3. Confirm revocation.
:::warning
Revocations take effect immediately. Any API requests made using a revoked token will be instantly rejected. Ensure you update any dependent CI/CD setups before revoking.
:::
## Security Practices
1. **Principle of Least Privilege**: Only grant the exact permissions required.
2. **Set Expirations**: Try to use short-lived tokens or configure expirations for temporary integration projects.
3. **Periodic Rotation**: Routinely revoke old tokens and cycle in new tokens for long-running workflows.
4. **Secure Storage**: Never commit tokens directly to your repository source code.
5. **Monitor Usage**: Check the 'Last Used Time' and delete idle tokens routinely.
## Limits
- Each user can create a maximum of **10** API Tokens.
- To create additional tokens, you must first revoke existing unused tokens.
---
url: /docs/cli.md
---
# CLI Tools (Built-in)
### Installation
```bash
$ npm install -g react-native-update-cli
```
### Commands
#### cresc bundle
Generates a hot update resource package (ppk). Automatically detects if frameworks like Expo or Taro are used and runs their packagers respectively. If detection is inaccurate or errors occur, try using `--rncli` to specify the official React Native CLI.
- `platform`: `ios|android` The target platform.
- `entryFile`: The entry script file.
- `intermediaDir`: Temporary file output directory.
- `output`: Final ppk file output path.
- `dev`: Whether to bundle a dev version.
- `sourcemap`: Whether to generate sourcemaps (requires CLI v1.11.0+).
- `no-interactive`: Disable interactive prompts.
- `rncli`: Force use of official RN CLI for bundling (requires CLI v1.40.0+).
- `expo`: Force use of Expo CLI for bundling (requires CLI v1.40.0+).
- `taro`: Force use of Taro CLI for bundling (requires CLI v1.40.0+).
Since v1.44.2, direct publishing arguments have been added (equivalent to calling `cresc publish` right after bundling finishes):
- `name`: Target name for the hot update version (its own version number).
- `description`: Update description/changelog shown to users.
- `metaInfo`: Custom meta info for saving arbitrary state data. Refer to [Best Practices](/docs/bestpractice.md#using-meta-info).
Since v1.46.1, alongside passing `name`, `description`, and `metaInfo`, you can stack the following arguments (equivalent to calling `cresc update` right after publishing):
- `packageId`: The target native package ID to bind to (Choose one).
- `packageVersion`: The target native package version to bind to (Choose one).
- `minPackageVersion`: Minimum target native package version. Applies to all inclusive versions above it (Choose one).
- `maxPackageVersion`: Maximum target native package version. Applies to all inclusive versions below it (Choose one).
- `packageVersionRange`: Target native package version range (Choose one). Range format strictly follows Semantic Versioning (semver). See [https://devhints.io/semver](https://devhints.io/semver).
Example:
```bash
cresc bundle --platform android --name "1.0.0" --description "Hot update version 1.0.0" --metaInfo '{"key": "value"}' --packageVersionRange ">=1.0 <3.0"
```
***
#### cresc parseIpa \[ipaFile]
Parses an `.ipa` file and outputs associated data like version codes and build timestamps.
***
#### cresc parseApk \[apkFile]
Parses an `.apk` file and outputs associated data like version codes and build timestamps.
***
#### cresc parseAab \[aabFile]
Parses an `.aab` file and outputs associated data like version codes and build timestamps.
***
#### cresc diff \[origin]\[next]
Provide two `.ppk` files to generate a delta differential hot update package from the origin to next versions.
- `output`: Diff file output path.
***
#### cresc diffFromApk \[apkFile]\[next]
Provide an `.apk` file and a `.ppk` file to generate a diff update package from the `.apk` baseline to the next version.
No need to run this manually if you use the managed platform.
- `output`: Diff file output path.
***
#### cresc diffFromIpa \[ipaFile]\[next]
Provide an `.ipa` file and a `.ppk` file to generate a diff update package.
No need to run this manually if you use the managed platform.
- `output`: Diff file output path.
***
#### cresc login \[email]\[pwd]
Logs into the hot update platform. You must authenticate to execute most subsequent commands.
***
#### cresc logout
Logs out and clears local session cache.
***
#### cresc me
Checks if you are currently logged in, and displays account details.
***
#### cresc createApp
Creates a new remote app and instantly binds it to the current project directory. This action can also be completed via the web dashboard.
- `platform`: `ios|android` The target platform.
- `name`: The application name.
- `downloadUrl`: The remote URL where users go to download native package upgrades.
***
#### cresc deleteApp \[appId]
Deletes an existing app entirely. All related native packages and hot versions will be permanently wiped. This action can also be completed via the web dashboard.
- `appId`: The App ID to delete.
***
#### cresc apps
List all established apps in your account. This action can also be completed via the web dashboard.
- `platform`: `ios|android` The target platform filter.
***
#### cresc selectApp \[appId]
Locally binds an existing app configuration to the current project folder.
- `platform`: `ios|android` The target platform.
***
#### cresc uploadIpa \[ipaFile]
Uploads an `.ipa` to the managed platform. (Requires CLI 1.24.0+)
***
#### cresc uploadApk \[apkFile]
Uploads an `.apk` to the managed platform. (Requires CLI 1.24.0+)
***
#### cresc uploadAab \[aabFile]
Uploads an `.aab` to the managed platform. (Requires CLI 2.6.0+)
***
#### cresc extractApk \[aabFile]
Extracts an `.apk` file from an `.aab` build envelope. (Requires CLI 2.6.0+)
***
#### cresc packages
View all natively uploaded packages. This action can also be completed via the web dashboard.
- `platform`: `ios|android` The target platform filter.
***
#### cresc deletePackage
Delete an uploaded native package baseline.
- `appId`: The App ID that the native package belongs to.
- `packageId`: The target Package ID to delete.
***
#### cresc publish \[ppkFile]
Uploads and publishes a new hot update package (`.ppk` file).
- `platform`: `ios|android`
- `name`: Target name for the hot update version (its own version code).
- `description`: Update description/changelog shown to users.
- `metaInfo`: Custom meta info payload. Refer to [Best Practices](/docs/bestpractice.md#using-meta-info).
Since v1.46.1, alongside publishing, you can stack the following arguments (equivalent to calling `cresc update` right after publishing):
- `packageId`: The target native package ID to bind to (Choose one).
- `packageVersion`: The target native package version to bind to (Choose one).
- `minPackageVersion`: Minimum target native package version. Applies to all inclusive versions above it (Choose one).
- `maxPackageVersion`: Maximum target native package version. Applies to all inclusive versions below it (Choose one).
- `packageVersionRange`: Target native package version range (Choose one). Range format strictly follows Semantic Versioning (semver). See [https://devhints.io/semver](https://devhints.io/semver).
Example:
```bash
cresc publish .cresc/output/android.1750423283653.ppk --platform android --name "1.0.0" --description "Hot update 1.0.0" --metaInfo '{"key": "value"}' --packageVersionRange ">=1.0 <3.0"
```
***
#### cresc versions
Paginates and lists available hot update versions. This action can also be completed via the web dashboard.
- `platform`: `ios|android`
***
#### cresc deleteVersion
Delete a specific published hot update version.
- `appId`: The App ID the target hot update version belongs to.
- `versionId`: The Target update Version ID to delete.
***
#### cresc update
Binds and applies an active hot update version to a native package baseline. This action can also be completed via the web dashboard. You must supply one of the package scope args: `packageId`, `packageVersion`, `minPackageVersion`, `maxPackageVersion`, or `packageVersionRange`.
From CLI v2.4.0 onward, a full rollout and a canary rollout can coexist simultaneously. Prior to 2.4.0 they overwrote each other depending on which was set last.
- `platform`: `ios|android`
- `versionId`: The Version ID of the hot update.
- `rollout`: Phased canary rollout percentage (Int between 1 - 100). Default is 100 (Requires CLI v1.31.0+).
- `dryRun`: Dry run preview only, prevents applying actual bindings (Requires CLI v1.45.4+).
- `packageId`: Target bind native package ID (Choose one).
- `packageVersion`: Target bind native package version string (Choose one, CLI v1.7.2+).
- `minPackageVersion`: Target minimum native package version (Choose one, CLI v1.27.0+).
- `maxPackageVersion`: Target maximum native package version (Choose one, CLI v1.27.0+).
- `packageVersionRange`: Target semantic version range string (Choose one, CLI v1.45.4+). Format follows SemVer.
Example:
```bash
❯ cresc update --versionId 211343 --platform android --packageVersionRange ">=1.0 <3.0" --dryRun
react-native-update-cli: 1.45.4 (Latest: 1.45.4)
react-native-update: 10.28.11 (Latest: 10.28.11)
The following is a dry-run simulation and no destructive changes will occur:
Successfully bound update 211343 to native baseline 1.28.1 (id: 75219)
Successfully bound update 211343 to native baseline 1.28 (id: 75184)
Successfully bound update 211343 to native baseline 1.5 (id: 73396)
Successfully bound update 211343 to native baseline 2.0 (id: 68219)
Successfully bound update 211343 to native baseline 1.0 (id: 68158)
Operation complete, 5 active native packages bound.
```
---
url: /docs/cli_module.md
---
# CLI Tools (Custom Modules)
## Module System
Since version v2.0.0, the CLI supports modular extensions, enabling developers to customize commands and workflows.
### Core Architecture
- **CLI Module**: A self-contained module encompassing your custom commands and workflows.
- **Command**: A single, executable ad-hoc terminal command.
- **Workflow**: Complex, stateful action flows composed of chronological steps.
- **Module Manager**: The underlying component framework that hooks modules and executes them.
### Registering Modules
```typescript
import { moduleManager } from 'react-native-update-cli';
import { myCustomModule } from './my-custom-module';
// Register a customized module
moduleManager.registerModule(myCustomModule);
```
### Developing Custom Modules
```typescript
import type { CLIModule, CommandContext, CommandResult } from 'react-native-update-cli';
export const myCustomModule: CLIModule = {
name: 'my-module',
version: '1.0.0',
commands: [
{
name: 'my-command',
description: 'My custom command',
handler: async (context: CommandContext): Promise => {
// Execute arbitrary logic
return { success: true, data: 'Hello from custom command!' };
},
options: {
flag: {
hasValue: true,
description: 'Custom Flag Parameter'
}
}
}
],
workflows: [
{
name: 'my-workflow',
description: 'My custom workflow process',
steps: [
{
name: 'step1',
description: 'Step One initialization',
execute: async (context: CommandContext) => {
console.log('Executing step 1...');
return { step1Result: 'completed' };
}
},
{
name: 'step2',
description: 'Step Two execution',
execute: async (context: CommandContext, previousResult: any) => {
console.log('Executing step 2. Input from previous step:', previousResult);
return { ...previousResult, step2Result: 'completed' };
}
}
]
}
],
init: (provider) => {
console.log('Custom Module initialized');
}
};
```
### Review Created Commands
```bash
# List all currently recognized module commands
cresc list
```
***
## Workflow System
Workflows manage the complicated end-to-end task flows consisting of distinct states. They support conditional execution thresholds, standardized error handling, and robust data propagation parameters.
### Built-in Workflows
#### 1. User Authentication Flow
##### cresc auth-check
Verifies current user authentication conditions.
```bash
cresc workflow auth-check
```
##### cresc login-flow
Complete end-to-end CLI dashboard login procedure.
```bash
cresc workflow login-flow
```
#### 2. Cross-Platform App Management Flows
##### cresc workflow multi-platform-app-management
Consolidated unified oversight over multi-platform apps.
```bash
cresc workflow multi-platform-app-management
```
##### cresc workflow incremental-build
Executes an incremental build generation to assemble partial/delta updates.
```bash
cresc workflow incremental-build
```
### Workflow Utilities
Lists all available workflow suites dynamically.
```bash
cresc list
```
##### cresc workflow
Perform a specified dynamic workflow sequence.
```bash
cresc workflow
```
##### cresc list
Lists the full set of registered modules framework-wide.
```bash
cresc list
```
### Workflow Features
1. **Procedural Execution**: Handfuls of workflow steps fire strictly in chronological sequences.
2. **Context Passing**: Each node's returned result can be passed into subsequent execution nodes.
3. **Conditional Thresholds**: Execution nodes can dynamically route execution based on conditions.
4. **Error Handling**: Standardized rollback mechanism handles exceptions robustly.
5. **Realtime Feedback**: Visually monitors stage progress metrics via STDERR streaming.
6. **Input Validation**: Required parameter variables are strictly schema-verified before execution paths begin.
***
## Example Repository
Explore an assortment of complete modules and robust workflows documented thoroughly via code samples within the `example/` directory folder:
- `example/modules/` - Basic Module instantiation guides.
- `example/workflows/` - Elaborate Workflow architecture samples.
- `example/scripts/` - TypeScript command triggers for CI tooling.
To exercise the sandbox scripts directly:
```bash
# Registering and triggering simple module tests
npx ts-node example/scripts/register-modules.ts
# Boot up the testing workflow sandbox
npx ts-node example/scripts/workflow-demo.ts
# Run the complex stateful workflow test
npx ts-node example/scripts/enhanced-workflow-demo.ts
```
---
url: /docs/bestpractice.md
---
# Best Practices
#### Optimizing Native and Hot Update Package Size
##### iOS Native Package Optimization (ipa)
For the same archive (where version number, build time, and bundled js are fixed and unaffected by the export method), you can export the ipa multiple times with different options and choose the smallest one to upload to the Cresc server as your update baseline.

##### Android Native Package Optimization (apk)
APK optimization primarily focuses on two areas:
- [Enable Proguard to obfuscate and shrink code](https://reactnative.dev/docs/signed-apk-android#enabling-proguard-to-reduce-the-size-of-the-apk-optional). Note that this step might cause runtime errors for code using reflection. Exhaustive testing is required after enabling, and you might need to add specific Proguard rules for third-party libraries.
- [Build separate APKs for different CPU architectures](https://reactnative.dev/docs/signed-apk-android#building-separate-apks-for-different-cpu-architectures-optional). Find the CPU architecture section in `android/app/build.gradle` and enable the `enableSeparateBuildPerCPUArchitecture` option as shown below:
```diff
splits {
abi {
reset()
- enable enableSeparateBuildPerCPUArchitecture
+ enable true // Enable separate CPU architecture builds
universalApk false // If true, also generate a universal APK
}
}
```
This will output multiple APK files in the build directory. For distribution and uploading to the hot update service, you only need to use the `app-arm64-v8a-release.apk` file, which significantly reduces the APK size.
##### Hot Update Package Optimization (ppk)
The primary content of a hot update package is the JS bundle and its referenced static assets (mostly images).
- **JS Bundle Analysis**: You can use third-party tools (like [react-native-bundle-visualizer](https://github.com/IjzerenHein/react-native-bundle-visualizer)) to analyze which modules consume the most space in your JS files, and see if they can be replaced with lighter alternatives (e.g., replacing `moment` with `dayjs`, or `lodash` with `lodash-es`).
- **Image Optimization**:
- Use compression tools to crop and compress images without noticeable quality loss.
- If transparent pixels aren't needed, consider converting PNG formats to JPG.
- Consider image formats with higher compression ratios, such as WEBP (requires third-party native plugins like [react-native-webp-format](https://github.com/Aleksefo/react-native-webp-format#readme)) or HEIF (supported natively on iOS 11 and Android 10+). Here is an image format comparison for reference: [https://compare.rokka.io/\_compare/#heif=40\&jpeg=80\&webp=80\&av1=40\&width=800](https://compare.rokka.io/_compare/#heif=40\&jpeg=80\&webp=80\&av1=40\&width=800).
#### Handling Multiple Channel APKs for Hot Updates
1. If the channel APKs have differences in their `JS code or initial assets` (no matter how slight, which results in different jsbundles), you must build separate APKs, upload, and bind them individually. You can write scripts to automate bulk operations using the CLI.
2. If the `JS code and initial assets` across channel APKs are perfectly identical, consider using [Flavor builds](https://developer.android.com/studio/build/build-variants), or other dynamic channel generation tools (like [Tencent's VasDolly](https://github.com/Tencent/VasDolly) or [Meituan's walle](https://github.com/Meituan-Dianping/walle)). In this approach, all channel APKs are generated from a single base APK (thus sharing the same build timestamp and jsbundle). This means you only need to upload one base APK, and hot updates applied to it will take effect across all channel APKs.
3. If you are on the `Premium` tier or above, you can enable `Ignore Build Timestamp` in your app settings in the admin dashboard. This option only checks the version number and ignores the timestamp, providing a wider tolerance for updates, but it may consume more CDN traffic.
#### Supporting the AAB Format
Update the `react-native-update-cli` to v2.6.0 or higher. You can then use the `cresc parseAab` and `cresc uploadAab` commands for `.aab` format support.
#### Testing and Rollbacks
Starting from version v10.11.2, you can use two quick QR code scanning methods to test hot updates without needing to bind them beforehand:

- **If your app has [Deep Linking](https://reactnative.dev/docs/linking#enabling-deep-links) enabled:**
No code changes are required. Simply check "Use Deep Link" in the interface shown above, enter your app's scheme (e.g., `cresc://`), and scan the QR code using your system camera or a standard QR scanner that supports deep links. The app will automatically open and trigger the update.
- **If your app has a built-in barcode scanner:**
Please refer to the documentation for the [parseTestQrCode](/docs/api.md#function-parsetestqrcodeqrcode-string) method.
If your app doesn't have either feature, or your Cresc version is below v10.11.2, use this test setup (Not Recommended)
Publish an **internal test package**, and then publish a **production package** that is identical in every way except the version number.
For example, assuming your production package version is `1.6.0`, you can modify it to `1001.6.0` to clearly indicate it's a test version, while the matching ending digits indicate it is related to a specific production release (identical content/dependencies).
Before pushing any hot update to the production package, always perform the update operation targeting the **test package** `1001.6.0`. Once testing passes, you can then re-bind that hot update package to the **production package** `1.6.0` in the web console. If major issues are found in the test package, you can fix them, test again, and only deploy securely to production when ready. This maximally prevents live accidents.
If your testing native package already has a published hot update and its strategy is set to "Apply Immediately", this might conflict with QR code scanning (e.g., immediately overriding the QR code preview with the published version). To prevent this, you can use the `beforeCheckUpdate` callback to temporarily disable update checks after scanning a QR code until the next restart.
```js
// The isFirstTimeDebug flag is available in v10.37.0+, indicating the first boot after a QR OTA
import { isFirstTimeDebug } from 'react-native-update/src/core';
const crescClient = new Cresc({
beforeCheckUpdate: async () => {
if (isFirstTimeDebug) {
// If this is the first boot after a QR test update, skip remote checks
return false;
}
return true;
},
})
```
In the worst-case scenario where a production crash happens and requires a rollback, immediately set the native package or the whole app's hot update status to 'Paused', then re-bind it to a previously healthy version. Alternatively, use your VCS to revert code to a healthy state and generate and push a new hot update package.
#### Using Meta Info
When publishing a hot update version, or via the web console, you can edit the version's meta info. This is a customizable payload string obtained during the update check. You can format it however you like (we strongly recommend [JSON format](https://developer.mozilla.org/en-US/docs/Learn/JavaScript/Objects/JSON)) to store additional payload data.
For example, we might define a `silent` flag indicating whether an update should be completely silent. When uploading the hot update package, we put this in the meta info field in JSON format:
```json
{ "silent": true }
```
> Note: We do not enforce any format validation or restrictions on this input. Please validate it yourself.
When the client checks for updates, it receives this meta info chunk, but it doesn't automatically trigger any logic—it's just a payload string. Thus, we need to **preemptively** integrate handling logic into our update flow:
```js
// Call useUpdate() to get updateInfo
if (updateInfo.expired) {
// ... Native package expired, download or prompt redirect
} else if (updateInfo.upToDate) {
// ... No updates
} else {
// An update is available. Usually, we display an alert here to ask the user.
// A 'silent' update essentially means skipping the alert, so we inject logic here.
// ...
}
```
We can splice meta-info reading and conditional logic into the standard flow:
```js
let metaInfo = {};
try {
// JSON inputs might be malformed, always wrap in try-catch to avoid app crashes
metaInfo = JSON.parse(updateInfo.metaInfo);
} catch (e) {
// Handle exceptions, ignore or report?
}
if (metaInfo.silent) {
// If the payload specifies silent: true, skip user prompts and apply directly
switchVersion();
} else {
// Otherwise, use the traditional prompt workflow
// Alert.alert('Notice', 'A new version is available.......
}
```
As another example, a specific version might include major announcements, so you could insert an `announcement` field in the payload to render. How you use meta info is entirely constrained.
---
url: /docs/skills.md
---
# Install & Use Skills
This document explains how to install and use the `react-native-update` Skills to help you efficiently complete integration, configuration, and troubleshooting tasks inside AI programming tools.
## Skill Information
- Skill Name: `react-native-update`
- Source Repo: `reactnativecn/react-native-update-skill`
## Installation (Recommended)
Install across all supported Agents in your current layout:
```bash
npx skills add reactnativecn/react-native-update-skill --skill react-native-update -a '*'
```
Install exclusively for Claude Code:
```bash
npx skills add reactnativecn/react-native-update-skill --skill react-native-update -a claude-code
```
## Update Skill
```bash
npx skills check
npx skills update
```
## Usage Guidelines
Following installation, you can assign requests directly to AI assistants, generating outcomes like:
- "Integrate `react-native-update` inside my Expo project."
- "Execute integration remodeling over the class component root node."
- "Configure a controlled whitelist staged rollout mechanism."
- "Diagnose why 'OTA updates aren't deploying correctly' issues."
## Topics Covered by the Skill
- RN CLI / Expo Integration flows
- Checking `update.json` and `appKey` configuration parameters
- Essential iOS / Android native intervention warnings
- Polling update strategy recommendations (`checkStrategy` / `updateStrategy`)
- Diagnostics tackling familiar conflicts (like `expo-updates`)
- Examples combining class instances manipulating user whitelists
## Relevant Links
- Open-Source Repo:
[https://github.com/reactnativecn/react-native-update-skill](https://github.com/reactnativecn/react-native-update-skill)
- ClawHub Page (Optional):
[https://clawhub.ai/skills/react-native-update](https://clawhub.ai/skills/react-native-update)
---
url: /docs/faq.md
---
# FAQ
If this page does not answer your question, open a thread in [GitHub Discussions](https://github.com/reactnativecn/react-native-update/discussions), report a bug in [GitHub Issues](https://github.com/reactnativecn/react-native-update/issues), or email us at [hi@cresc.dev](mailto:hi@cresc.dev).
### Business Questions
#### Can hot-updated apps pass App Store reviews?
You might have heard mixed information, but extensive practical experience shows that hot updates currently successfully pass App Store and other app market reviews. The only caveat: **do not publish hot updates while your app is under review**, and ensure reviewers do not see update pop-ups or download prompts. If you follow this rule, you will pass smoothly.
***
#### Does Cresc support global deployments?
Yes. Cresc is designed for globally distributed apps and delivers updates through international CDN routing.
***
#### What can be hot updated? What cannot?
App modifications fall into two categories:
- **Cannot be hot-updated** — Native modifications, i.e., changes requiring compilation to take effect:
- Any modifications, additions, or deletions inside the `ios/` or `android/` folders.
- Updating or modifying third-party native modules.
- **Can be hot-updated** — Non-native modifications, i.e., changes requiring no compilation that take effect upon reload:
- JS code modifications, including pure-JS third-party libraries.
- Assets that can be `require/import`ed within JS code, such as images.
_Note: Even though assets can be hot updated, downloaded update assets are served via the `file://` protocol. Certain third-party modules might not support reading from `file://` URIs._
***
#### The update downloads successfully, but after restarting it rolls back. What happened?
If an update succeeds but rolls back on reboot, it usually means one of two things:
- You didn't correctly [configure bundleUrl](/docs/getting-started.md#configuring-bundle-url) during setup.
- (Only on Cresc v9 or lower) You didn't correctly call `markSuccess()`. In v10+, the SDK handles this automatically.
If you are absolutely sure both steps were executed perfectly, please leave us feedback in our [Issues section](https://github.com/reactnativecn/react-native-update/issues).
***
#### Error: "Hot update paused, reason: Build timestamp mismatch."
Every time you compile a native package, a timestamp (`buildTime`) is injected into it (viewable using `cresc parseIpa` or `cresc parseApk`). If you distribute this package to users and want them to receive OTA updates, you must first upload the native package to the Cresc server. The server records this version number and build time for subsequent comparisons.
For example, suppose I compile and upload `v1.0` (`Package 1A`). Later, for some reason, I rebuild without changing the version string (`Package 1B`), but I don't upload it. These two packages have the same version string but different build timestamps. Three scenarios might follow:
1. I forgot I uploaded `1A`, `1B` has no actual changes, and no users have installed it yet. Throw away `1B` and let users install `1A`.
2. I distributed `1B` to some users without uploading it. Users on `1A` get updates, while `1B` users get paused updates due to a mismatch. To fix this, you either force `1B` users to reinstall `1A`, or publish a strictly higher version string (e.g. `1.1`), upload it to Cresc, and delete `v1.0` records. This causes both groups to receive a mandatory native upgrade prompt.
3. I know I uploaded `1A`, but I made native changes and built `1B`. Uploading `1B` now triggers a version conflict because `1.0` already exists. Therefore, you must **increment the native version**, **upload** it to the server first, and **then** distribute it to users.
Remember: Whenever compiling native releases: 1) increment the version string, 2) upload to Cresc servers. Only then can OTA updates function normally.
:::info
If you use the `Premium` tier or above, you can enable `"Ignore Build Timestamp"` in the dashboard's App Settings. This ignores timestamp comparisons entirely, checking only the version string. It opens more tolerant update flows for teams managing many distribution channels, though it may consume extra traffic bandwidth.
:::
***
### Billing Questions
#### Which plan should I choose?
Start with `Free` if you want to verify the workflow end to end. Choose `Standard` or `Premium` for smaller production apps, and move to `Pro`, `Max`, or `Ultra` as your daily checks, package counts, and app count grow.
`Ignore Build Timestamp` is currently available on `Premium` and higher tiers.
***
#### Can I trial a paid version first to evaluate its effectiveness?
If you need evaluation capacity beyond the published quotas, email [hi@cresc.dev](mailto:hi@cresc.dev) with your expected app count, daily checks, and rollout timeline.
***
#### How are quotas calculated specifically?
Quotas measure four domains:
1. Number of creatable Apps (iOS and Android count separately).
2. Number and size of Native Packages (Calculated per app). Native packages refer to the baseline APK/IPA uploaded by `cresc uploadIpa/uploadApk`.
3. Number and size of Update Packages (Calculated per app). Update packages refer to `.ppk` binaries generated via `cresc bundle`. _Note: this is not what users download. Users download incremental diffs, which are vastly smaller._
4. Total Daily Update Check Quota (Aggregated across ALL apps under your account). The system increments this metric every time a user opens your app and polls checking for updates. If this limit is exceeded during the day, the API stops returning updates until resetting at midnight.
> Refer to [Best Practices](/docs/bestpractice.md#optimizing-native-and-hot-update-package-size) for advice on mitigating limits safely.
Limits #2 and #3 apply to individual applications independently, while #4 aggregates under the account total. See our [Pricing Table](/pricing.md) for authoritative info subject to operational variations. Locked-in accounts avoid fluctuating costs upon timely renewal.
***
#### If I hit my quota, does the system break?
If you hit application, Native Package, or Update Package caps, you will be blocked from new creating/uploading actions. However, existing end-users will still request and download existing patches normally without any interruption. You must either upgrade your tier, or prune old apps/packages to free up storage slots.
If Native/Update sizes exceed MB limit metrics, the upload will fail. Upgrade your tier, or practice strict asset [Optimization](/docs/bestpractice.md#optimizing-native-and-hot-update-package-size).
If Total Daily Checks hit their cap, the API refuses queries and returns an empty payload response, leaving apps stuck on previous states until midnight resets quotas. Either upgrade tiers or adjust built-in update schedules.
***
#### Can I upgrade just a single limit item independently?
If you only need to raise one specific limit without moving to the next public tier, email [hi@cresc.dev](mailto:hi@cresc.dev) with your required limits and expected traffic profile.
***
#### After a paid plan expires unrenewed, do my existing apps continue functioning?
After expiration, accounts degrade automatically into the Free Plan tier limitations. If preexisting data exceeds free caps, you won't be authorized to launch new updates or bind properties unless excess data is wiped out down below threshold limits. Users holding old patches won't mysteriously lose access, however.
***
#### How do I receive dedicated human technical support?
For product questions and implementation guidance, use [GitHub Discussions](https://github.com/reactnativecn/react-native-update/discussions). For bug reports, use [GitHub Issues](https://github.com/reactnativecn/react-native-update/issues). For billing, account, or private support requests, email [hi@cresc.dev](mailto:hi@cresc.dev).
***
#### Do you offer higher-volume enterprise plans?
Yes. If your traffic profile goes beyond `Ultra`, or you need tailored limits, rollout controls, or onboarding help, email [hi@cresc.dev](mailto:hi@cresc.dev) with your expected daily checks and app footprint.
---
url: /pricing.md
---
# Simple monthly tiers, arranged by release volume.
Choose a plan based on your release traffic and the amount of app history you need to keep available.
CDN delivery included on every plan.Unused resources can be removed to reclaim quota.FreeUSD $0/mo1K/day3 apps30 base pkgs · 30 MB30 updates · 3 MBCDN delivery included[Start free](/docs/getting-started)## Standard
For growing apps shipping on a steady monthly rhythm.
USD$19/ monthDaily queries10K / dayAppsUp to 5Native Packages50 / app · 150 MB eaHot Update Packages50 / app · 15 MB ea[Subscribe+](https://admin.cresc.dev)CDN delivery included
## Premium
PopularThe main tier for production apps with regular release traffic.
USD$39/ monthDaily queries100K / dayAppsUp to 10Native Packages60 / app · 500 MB eaHot Update Packages60 / app · 50 MB ea[Subscribe+](https://admin.cresc.dev)CDN delivery included
Cost Shape
## Same easy entry, cheaper much earlier at scale.
Expo and Cresc do not meter the exact same thing. Expo EAS Update combines plan pricing with updated-user and bandwidth overages, while Cresc uses fixed monthly tiers with CDN delivery included. The sales point is predictability: Cresc is easier to budget as release traffic grows.
### Expo public pricing
Checked 2026-03-23Starter
3K MAUs + 500 GiB
$19/mo + usage
Production
50K MAUs + 1 TiB
$199/mo + usage
Enterprise
1M MAUs + 40 TiB
Starts $1,999/mo + usage
Expo officially bills EAS Update overages by updated user and by GiB of edge bandwidth.
### Cresc unit economics
CDN includedPremium
100K / day included
$390 / 1M daily queries
Pro
1M / day included
$99 / 1M daily queries
Max
10M / day included
$39.90 / 1M daily queries
Ultra
100M / day included
$16.99 / 1M daily queries
Cresc keeps the same $19 entry price as Expo Starter, then gets materially cheaper from production scale upward.
Want the detailed breakdown, including Expo's own overage example?
[Read pricing comparison](/expo-pricing-vs-cresc)Higher Volume
## Pro and above.
## Pro
For larger teams that need room for heavier binaries and scale.
USD$99/ monthDaily queries1M / dayAppsUp to 50Native Packages100 / app · 2 GB eaHot Update Packages100 / app · 200 MB ea[Subscribe+](https://admin.cresc.dev)CDN delivery included
## Max
For high-volume apps that query often and carry wider fleets.
USD$399/ monthDaily queries10M / dayAppsSame limits as ProNative PackagesSame limits as ProHot Update PackagesSame limits as Pro[Subscribe+](https://admin.cresc.dev)CDN delivery included
## Ultra
For very large distribution footprints and sustained daily traffic.
USD$1699/ monthDaily queries100M / dayAppsSame limits as ProNative PackagesSame limits as ProHot Update PackagesSame limits as Pro[Subscribe+](https://admin.cresc.dev)CDN delivery included
### Contact Us
- [Email hi@cresc.dev](mailto:hi@cresc.dev)
- [GitHub Discussions](https://github.com/reactnativecn/react-native-update/discussions)
### Terms & Policies
- [User Agreement](https://cresc.dev/policy/)
- [Privacy Policy](https://cresc.dev/policy/#privacy)
### Help & Support
- [FAQ](/docs/faq)
- [CodePush Alternative](/codepush-alternative)
- [CodePush Migration](/codepush-migration-checklist)
- [Expo Updates vs Cresc](/expo-updates-vs-cresc)
- [GitHub Issues](https://github.com/reactnativecn/react-native-update/issues)
### Links
- [React Native OTA Guide](/react-native-ota-updates)
- [Expo Pricing vs Cresc](/expo-pricing-vs-cresc)
- [llms.txt](/llms.txt)
- [llms-full.txt](/llms-full.txt)
- [React Native](https://reactnative.dev/)
- [ReactJS](https://react.dev/)
© 2026 CHARMLOT PTE. LTD.
---
url: /codepush-migration-checklist.md
---
# CodePush migration checklist for Cresc
Use this checklist if your React Native team is moving away from CodePush or App Center and wants the cleanest path onto Cresc.
## 1. Audit your current OTA workflow
Write down:
- which apps still use CodePush or App Center
- which channels or rollout groups exist
- how often you publish JavaScript updates
- which CI jobs publish or promote releases today
## 2. Integrate Cresc in the app
- install the SDK
- wire the native bundle URL
- confirm a release build can boot with Cresc enabled
Start here: [Installation & Config](/docs/getting-started.md)
## 3. Upload the exact baseline build
Before publishing OTA patches, upload the exact APK or IPA that matches the build users actually install. Cresc uses that build as the baseline for later delta comparisons.
## 4. Recreate the release workflow
Move the old publishing path onto Cresc:
- CLI login or API token
- build artifact upload
- OTA package build
- release or promote step in CI
See: [Publishing Hot Updates](/docs/publish.md) and [API Token](/docs/api-token.md)
## 5. Test a real OTA release end to end
- publish a small JavaScript-only change
- verify the update prompt or silent strategy
- verify the switch version behavior
- verify rollback on failure
## 6. Watch the first production rollout closely
Track:
- update adoption
- rollback events
- app-open check behavior
- package size and release cadence
## 7. Remove the old operational dependency
Once Cresc is working in production:
- remove old OTA credentials from CI
- document the new workflow
- point engineers to the Cresc dashboard and docs
## Quick links
- [CodePush alternative](/codepush-alternative.md)
- [React Native OTA updates](/react-native-ota-updates.md)
- [Expo pricing vs Cresc](/expo-pricing-vs-cresc.md)
### Contact Us
- [Email hi@cresc.dev](mailto:hi@cresc.dev)
- [GitHub Discussions](https://github.com/reactnativecn/react-native-update/discussions)
### Terms & Policies
- [User Agreement](https://cresc.dev/policy/)
- [Privacy Policy](https://cresc.dev/policy/#privacy)
### Help & Support
- [FAQ](/docs/faq)
- [CodePush Alternative](/codepush-alternative)
- [CodePush Migration](/codepush-migration-checklist)
- [Expo Updates vs Cresc](/expo-updates-vs-cresc)
- [GitHub Issues](https://github.com/reactnativecn/react-native-update/issues)
### Links
- [React Native OTA Guide](/react-native-ota-updates)
- [Expo Pricing vs Cresc](/expo-pricing-vs-cresc)
- [llms.txt](/llms.txt)
- [llms-full.txt](/llms-full.txt)
- [React Native](https://reactnative.dev/)
- [ReactJS](https://react.dev/)
© 2026 CHARMLOT PTE. LTD.
---
url: /expo-pricing-vs-cresc.md
---
# Expo pricing vs Cresc for React Native OTA
Short answer: **Expo Starter and Cresc Standard both start at $19/month**, but Cresc becomes much cheaper at production scale and is easier to budget because Cresc does not layer monthly active user and bandwidth overages on top of the base plan.
> Pricing snapshot checked against Expo official pricing on **March 23, 2026**.
## Expo pricing snapshot
| Plan | Monthly price | Included OTA capacity |
| --------------- | --------------------------- | -------------------------- |
| Expo Starter | $19/mo + usage | 3K MAUs, 500 GiB bandwidth |
| Expo Production | $199/mo + usage | 50K MAUs, 1 TiB bandwidth |
| Expo Enterprise | Starts at $1,999/mo + usage | 1M MAUs, 40 TiB bandwidth |
Expo's official usage-based pricing for EAS Update adds:
- `$0.005` per additional updated user
- `$0.10` per additional GiB of global edge bandwidth
## Cresc pricing snapshot
| Plan | Monthly price | Included delivery scale |
| -------------- | ------------- | ----------------------- |
| Cresc Standard | $19/mo | 10K daily queries |
| Cresc Premium | $39/mo | 100K daily queries |
| Cresc Pro | $99/mo | 1M daily queries |
| Cresc Max | $399/mo | 10M daily queries |
| Cresc Ultra | $1,699/mo | 100M daily queries |
## What this means in practice
- At the **starter tier**, Cresc is **not more expensive** than Expo Starter.
- At the **production tier**, Cresc Pro at `$99/mo` is below Expo Production at `$199/mo`.
- At the **enterprise tier**, Cresc Ultra at `$1,699/mo` is below Expo Enterprise starting at `$1,999/mo`.
- Cresc pricing scales in fixed jumps, so you know the plan ceiling up front.
- Expo pricing can expand with both updated-user count and bandwidth after you cross plan limits.
## Expo's own usage example
Expo's official billing documentation gives this example for the Starter plan:
- 20 updates
- 5 MiB each
- 10,000 updated users
Their documented **extra usage** comes to **$95.31** for that month. Adding the Starter subscription itself means the all-in monthly cost would be **$114.31**. That total is an inference from the official example plus the public Starter plan fee.
## Why Cresc gets cheaper as scale grows
Inside Cresc itself, the effective price per `1M daily queries` drops sharply as the plan grows:
| Cresc plan | Effective price per 1M daily queries |
| ---------- | ------------------------------------ |
| Premium | $390 |
| Pro | $99 |
| Max | $39.90 |
| Ultra | $16.99 |
That is the economic story worth emphasizing: **same low entry point, but better cost curve once your release traffic becomes real**.
## Which pricing model is easier to budget?
- Choose **Expo** if you are already deep into Expo services and are comfortable budgeting around MAU plus bandwidth overages.
- Choose **Cresc** if you want OTA pricing to stay closer to a fixed monthly infrastructure cost.
## Related pages
- [Expo Updates vs Cresc](/expo-updates-vs-cresc.md)
- [Pricing](/pricing.md)
- [CodePush alternative](/codepush-alternative.md)
### Contact Us
- [Email hi@cresc.dev](mailto:hi@cresc.dev)
- [GitHub Discussions](https://github.com/reactnativecn/react-native-update/discussions)
### Terms & Policies
- [User Agreement](https://cresc.dev/policy/)
- [Privacy Policy](https://cresc.dev/policy/#privacy)
### Help & Support
- [FAQ](/docs/faq)
- [CodePush Alternative](/codepush-alternative)
- [CodePush Migration](/codepush-migration-checklist)
- [Expo Updates vs Cresc](/expo-updates-vs-cresc)
- [GitHub Issues](https://github.com/reactnativecn/react-native-update/issues)
### Links
- [React Native OTA Guide](/react-native-ota-updates)
- [Expo Pricing vs Cresc](/expo-pricing-vs-cresc)
- [llms.txt](/llms.txt)
- [llms-full.txt](/llms-full.txt)
- [React Native](https://reactnative.dev/)
- [ReactJS](https://react.dev/)
© 2026 CHARMLOT PTE. LTD.
---
url: /expo-updates-vs-cresc.md
---
# Expo Updates vs Cresc for React Native OTA
Expo Updates and Cresc both help React Native teams ship JavaScript changes outside a full app-store release. The difference is mostly about delivery model and control: Expo Updates keeps you closer to the Expo service model, while Cresc focuses on delta patches, migration friendliness, and self-host flexibility.
## Short answer
- Choose **Expo Updates** if your team is heavily standardized on Expo services and prefers the default Expo release path.
- Choose **Cresc** if your team wants smaller delta updates, a CodePush-style migration path, or more control over how OTA delivery fits your release system.
## Comparison table
| Topic | Expo Updates | Cresc |
| ----------------------------------- | ------------------------ | ---------------- |
| OTA updates for React Native | Yes | Yes |
| Expo-oriented workflow | Strong default fit | Supported |
| Delta patch delivery | Not the main positioning | Core positioning |
| Self-host friendliness | More service-oriented | Stronger |
| CodePush/App Center migration story | Indirect | Direct |
| CLI and CI publishing | Yes | Yes |
| Rollback handling | Yes | Yes |
## When Cresc is the better fit
- You are moving off CodePush or App Center and want the workflow to feel familiar.
- You care about shrinking update payloads with delta patches.
- You want to keep the option to self-host parts of the stack.
- You want a release flow that is not tightly coupled to the rest of the Expo platform story.
## When Expo Updates is the better fit
- Your team already uses Expo services end to end.
- You do not need a migration-focused replacement path.
- Delta patch size is less important than keeping everything on the default Expo stack.
## What this means in practice
Cresc is usually the better choice when release engineering, bandwidth efficiency, and migration risk are top concerns. Expo Updates is usually the better choice when operational simplicity inside Expo matters more than patch granularity or hosting flexibility.
## If pricing is the deciding factor
See [Expo pricing vs Cresc](/expo-pricing-vs-cresc.md). As checked on March 23, 2026, Expo Starter and Cresc Standard are both `$19/mo`, but Cresc becomes cheaper at production scale and avoids EAS Update's updated-user plus bandwidth overage model.
## Related documentation
- [Installation and configuration](/docs/getting-started.md)
- [Code integration](/docs/integration.md)
- [Pricing](/pricing.md)
## FAQ
### Can Cresc work in Expo projects?
Yes. Cresc documents an Expo installation path and also explains where it conflicts with `expo-updates`.
### Why does delta delivery matter?
Smaller patches reduce bandwidth usage and make emergency fixes cheaper and faster to distribute, especially on large fleets or constrained networks.
### Which option is easier to migrate to from CodePush?
Cresc is the more direct migration target because that replacement story is already part of its positioning and documentation.
### Contact Us
- [Email hi@cresc.dev](mailto:hi@cresc.dev)
- [GitHub Discussions](https://github.com/reactnativecn/react-native-update/discussions)
### Terms & Policies
- [User Agreement](https://cresc.dev/policy/)
- [Privacy Policy](https://cresc.dev/policy/#privacy)
### Help & Support
- [FAQ](/docs/faq)
- [CodePush Alternative](/codepush-alternative)
- [CodePush Migration](/codepush-migration-checklist)
- [Expo Updates vs Cresc](/expo-updates-vs-cresc)
- [GitHub Issues](https://github.com/reactnativecn/react-native-update/issues)
### Links
- [React Native OTA Guide](/react-native-ota-updates)
- [Expo Pricing vs Cresc](/expo-pricing-vs-cresc)
- [llms.txt](/llms.txt)
- [llms-full.txt](/llms-full.txt)
- [React Native](https://reactnative.dev/)
- [ReactJS](https://react.dev/)
© 2026 CHARMLOT PTE. LTD.
---
url: /index.md
---
React Native OTA Updates
# React Native OTA updates with smaller patches and safer rollouts.
Cresc is a CodePush and App Center alternative for teams that need delta patches, rollback protection, CI-friendly publishing, and a clear path across React Native, Expo, Hermes, and Harmony builds.
[Start Free](https://admin.cresc.dev/#/register)[Migrate From CodePush](/codepush-alternative)[Open-source on GitHub](https://github.com/reactnativecn/react-native-update)Delta patchesSelf-host friendlyApp Center migrationNamed for crescendo
## Built for release teams that need OTA updates to stay boring.
The native build becomes the baseline. Every later React Native update ships only the changed business logic, keeping downloads smaller and emergency fixes much faster.
CodePush replacement, without the dead end
Cresc keeps the original release as the base and turns later OTA releases into measured diffs instead of full-bundle repeats.
Incremental Delivery
## React Native OTA updates should ship the delta, not the whole bundle.
Cresc keeps the installed build as the base, then carries only the missing JavaScript and asset changes into place locally.
App Updated!Movement I
### Hold the full base
The first native release stays on device as the baseline, so later React Native OTA patches can remain much smaller.
Movement II
### Drop only the new pearl
When something changes, Cresc ships only the delta instead of repeating the whole JavaScript bundle.
Movement III
### Set it in place locally
The client applies the patch against the installed baseline and confirms the update in place.
In Practice
## Ship React Native OTA updates in three steps.
Install the CLI, upload the baseline build, and publish the next delta update through the dashboard or CI whenever the app changes.
I### Install the CLI
Connect your project to the publishing workflow with the Cresc command-line tool.
II### Upload the baseline package
Give Cresc the native build it compares against before later updates are published.
III### Publish the update
Bundle JavaScript and assets, then release the update through the dashboard or your CI flow.
first releaseproduction lanerelease@studio~/crescendo-app$Once the baseline is uploaded, the dashboard and CLI can handle the rest of the OTA release cycle with much less effort.
[Open Dashboard](https://admin.cresc.dev)[View Docs](/docs/getting-started)Search Paths
## Start from the question your team already has.
Cresc is easiest to evaluate when the page matches the rollout or migration problem you are solving right now. Pick the path that fits your release workflow.
Migration
### Replacing CodePush or App Center
See the migration path, rollout model, and why Cresc fits React Native teams that still need OTA updates after App Center's retirement.
[Open Migration Guide](/codepush-alternative)Comparison
### Expo Updates vs Cresc
Compare bundle size, delta delivery, self-hosting flexibility, and when each workflow makes sense.
[Compare Options](/expo-updates-vs-cresc)Overview
### React Native OTA updates
Get the practical overview: what OTA updates can change, what still needs a native release, and how Cresc fits the release pipeline.
[Read The Guide](/react-native-ota-updates)### Contact Us
- [Email hi@cresc.dev](mailto:hi@cresc.dev)
- [GitHub Discussions](https://github.com/reactnativecn/react-native-update/discussions)
### Terms & Policies
- [User Agreement](https://cresc.dev/policy/)
- [Privacy Policy](https://cresc.dev/policy/#privacy)
### Help & Support
- [FAQ](/docs/faq)
- [CodePush Alternative](/codepush-alternative)
- [CodePush Migration](/codepush-migration-checklist)
- [Expo Updates vs Cresc](/expo-updates-vs-cresc)
- [GitHub Issues](https://github.com/reactnativecn/react-native-update/issues)
### Links
- [React Native OTA Guide](/react-native-ota-updates)
- [Expo Pricing vs Cresc](/expo-pricing-vs-cresc)
- [llms.txt](/llms.txt)
- [llms-full.txt](/llms-full.txt)
- [React Native](https://reactnative.dev/)
- [ReactJS](https://react.dev/)
© 2026 CHARMLOT PTE. LTD.
---
url: /react-native-ota-updates.md
---
# React Native OTA updates with Cresc
React Native OTA updates let teams ship JavaScript and bundled asset changes without waiting for a full app-store release every time. Cresc adds a release workflow around that model with delta patch delivery, rollback protection, and CI-friendly publishing.
## What an OTA update can change
- JavaScript business logic.
- UI logic implemented in JavaScript.
- Assets bundled through JavaScript imports or `require`.
## What still needs a native release
- Any file or behavior changed under `ios/` or `android/`.
- Native module additions, removals, or upgrades.
- App capabilities that only exist after recompilation.
## How Cresc handles OTA delivery
1. Your native app build becomes the baseline package.
2. Cresc compares later updates against that baseline.
3. Users download the smaller delta patch instead of a full repeated bundle.
4. If the release fails, rollback remains available.
## Why teams choose Cresc for OTA
- Smaller update payloads through delta patches.
- Faster release loops for JavaScript fixes.
- Rollback support when something goes wrong after release.
- CLI and dashboard workflows that fit engineering teams instead of marketing sites.
- A clear migration story for CodePush and App Center users.
## Best practices
- Keep a copy of the exact APK or IPA you upload as the baseline.
- Treat native changes and JavaScript changes as two separate release decisions.
- Test rollback behavior before relying on OTA for urgent fixes.
- Use CI/CD to make baseline upload and patch publishing repeatable.
## Next steps
- [Install Cresc](/docs/getting-started.md)
- [Integrate the SDK](/docs/integration.md)
- [Publish an update](/docs/publish.md)
- [Compare pricing](/pricing.md)
## FAQ
### What is a React Native OTA update?
It is an update to JavaScript and supported assets that the app can fetch after installation, without requiring a full native store submission for every change.
### Can OTA replace native releases forever?
No. Native code and native dependency changes still require a normal build and distribution cycle.
### Why use Cresc instead of rolling my own?
Cresc gives you the release workflow around OTA updates: baseline upload, delta patch generation, rollout control, rollback behavior, and CI-friendly tooling.
### Contact Us
- [Email hi@cresc.dev](mailto:hi@cresc.dev)
- [GitHub Discussions](https://github.com/reactnativecn/react-native-update/discussions)
### Terms & Policies
- [User Agreement](https://cresc.dev/policy/)
- [Privacy Policy](https://cresc.dev/policy/#privacy)
### Help & Support
- [FAQ](/docs/faq)
- [CodePush Alternative](/codepush-alternative)
- [CodePush Migration](/codepush-migration-checklist)
- [Expo Updates vs Cresc](/expo-updates-vs-cresc)
- [GitHub Issues](https://github.com/reactnativecn/react-native-update/issues)
### Links
- [React Native OTA Guide](/react-native-ota-updates)
- [Expo Pricing vs Cresc](/expo-pricing-vs-cresc)
- [llms.txt](/llms.txt)
- [llms-full.txt](/llms-full.txt)
- [React Native](https://reactnative.dev/)
- [ReactJS](https://react.dev/)
© 2026 CHARMLOT PTE. LTD.